This post may contain affiliate links or sponsored content. That means if you click on my link and buy something, I will earn a small commission from the advertiser at no additional cost to you. For more information, see our disclosure policy.
These homemade Pickled Cherry Peppers are so delicious and effortless with only 10 minutes of prep time! Make this recipe with your home garden harvest or with hot cherry peppers from your local farm stand, farmers’ market or grocery store.
Pickled Hot Cherry Peppers are one of my kitchen staples–an ingredient that I always want to have on hand anytime I need to add a little acid + heat to a dish or a sandwich.
They’re important flavor builders in my spicy arrabbiata sauce, scungilli pasta fra diavolo, crispy baked calamari and both my scungilli salad and baccala salad recipes (both a big part of Christmas Eve’s Feast of the Seven Fishes.)
Not to mention how utterly perfect they are in any sandwich or panino–cold or hot!
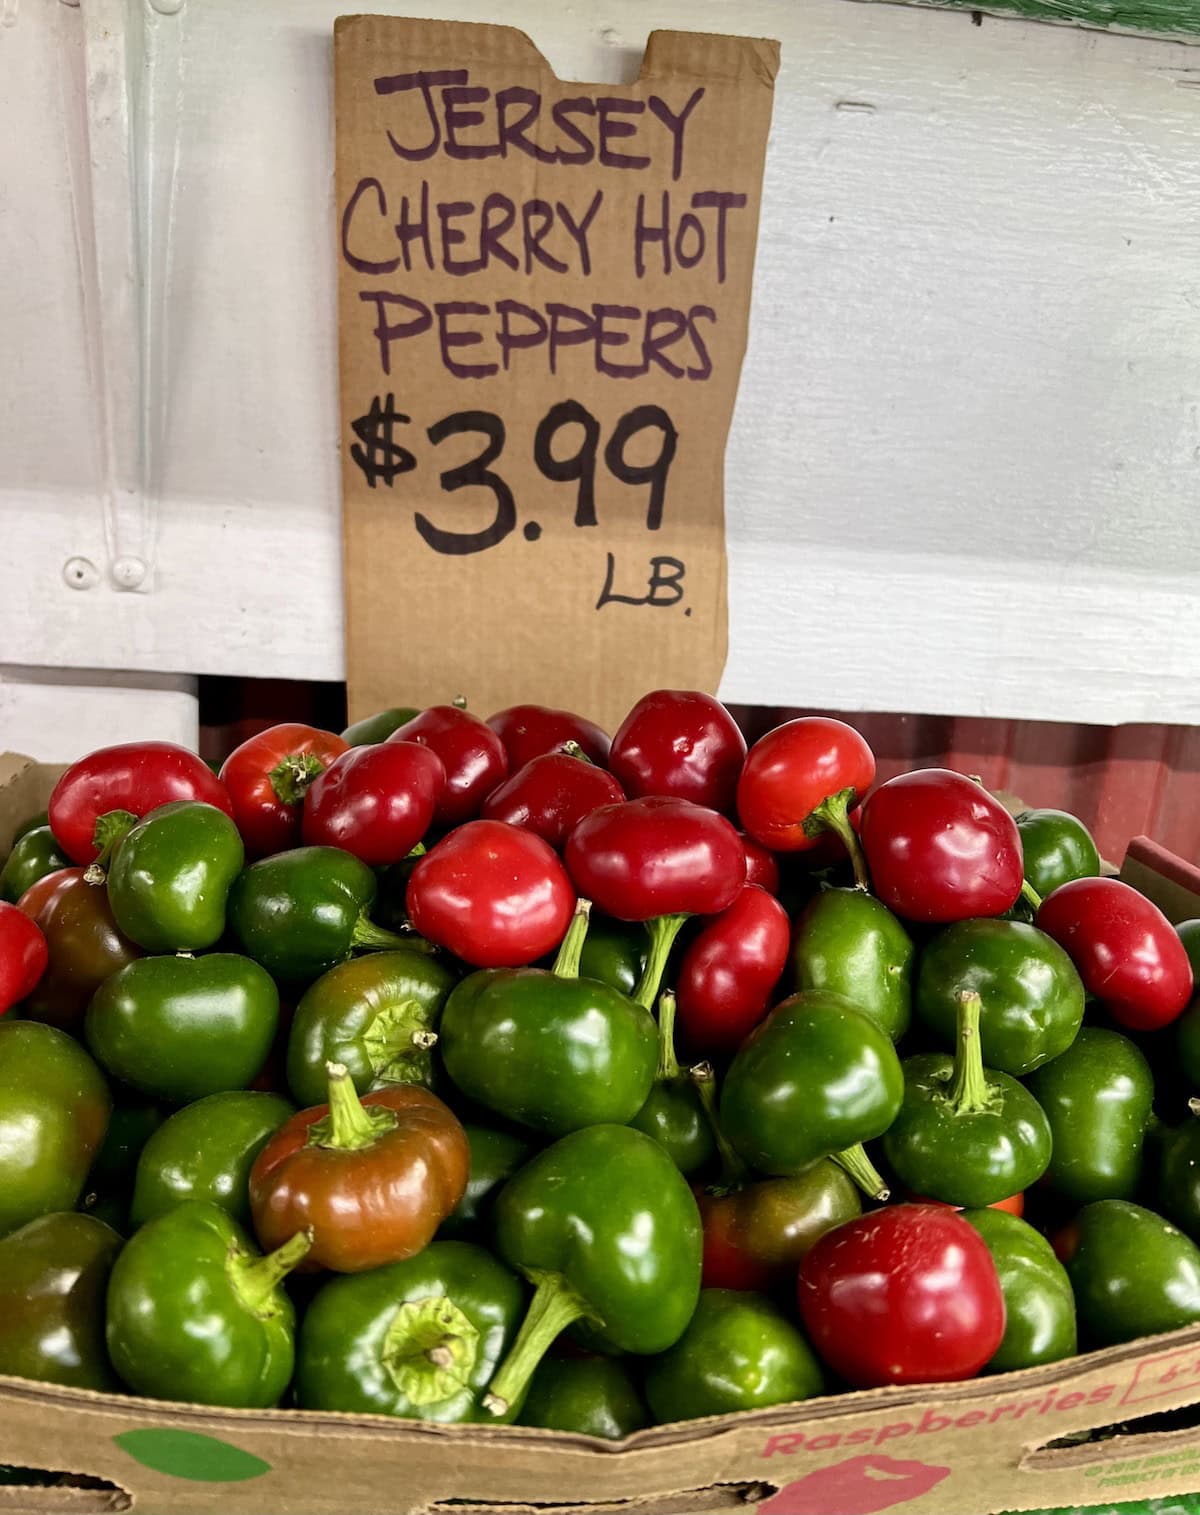
Other than at a local farm stand or farmers’ market in late summer/early fall, though, fresh (raw) hot cherry peppers are a bit difficult to come by. (Jarred (or bulk) pickled versions are generally available on grocery store shelves or on olive bars.)
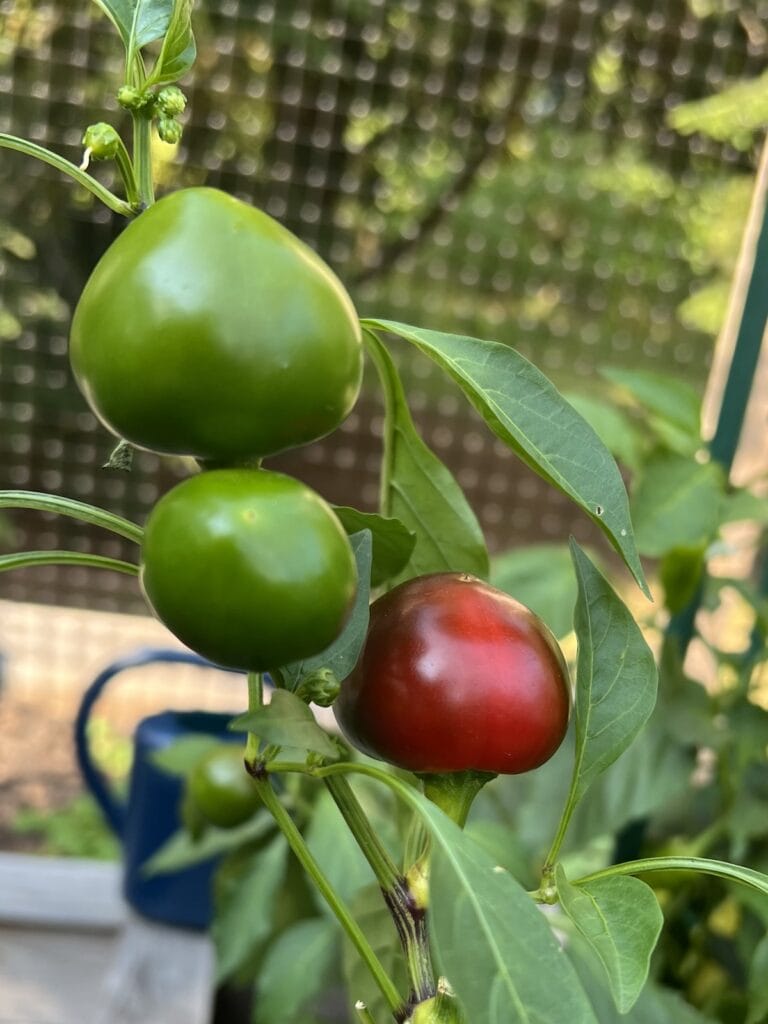
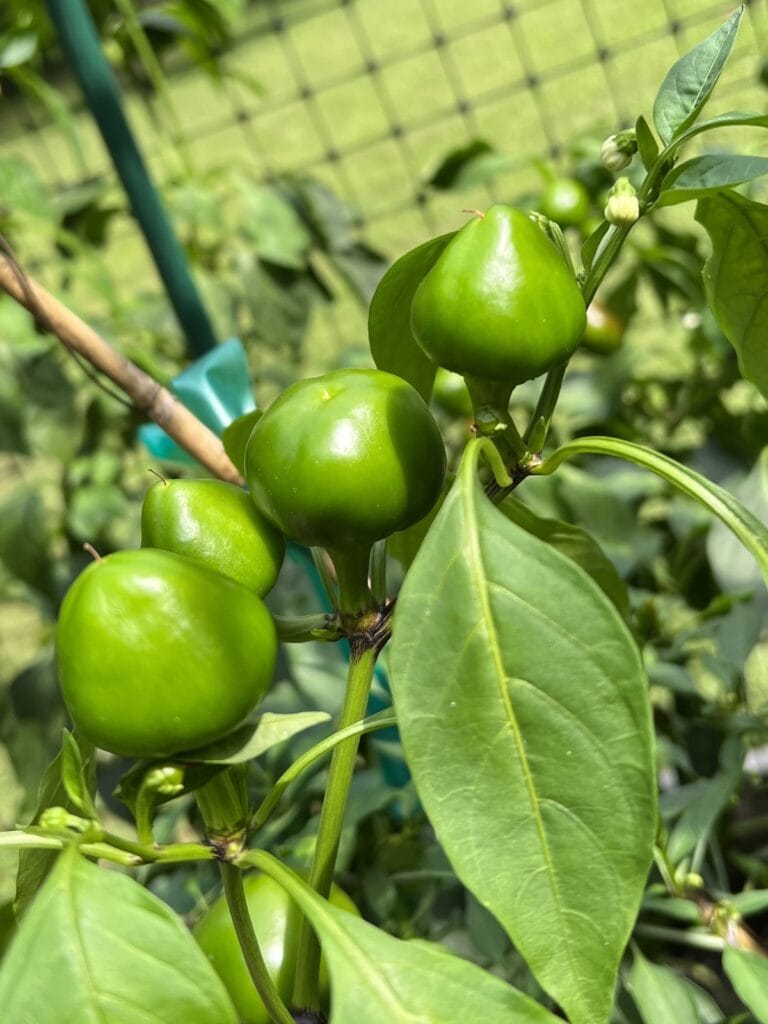
That’s why, along with cubanelle peppers, long hots and (my favorite) Jimmy Nardello peppers, I’ve been growing hot cherry peppers in my backyard garden since I started gardening three summers ago.
And, while you’ll find me dehydrating a bunch to use as red pepper flakes (which are super-flavorful, by the way), I quick pickle most of them to enjoy over several weeks.
With just a few basic ingredients that include vinegar, salt, water, garlic, peppercorns and bay leaves, these pickled hot cherry peppers (a.k.a., vinegar cherry peppers) taste so much better than the store-bought versions, are much more economical and are free of food dyes and corn syrups!
This quick pickling technique is very similar to marinated mushrooms. Just add the raw peppers (either whole or cored and seeded-see FAQs below) to a hot seasoned brine and wait. That’s it!
And, although this recipe is similar to classic Italian peperoni sott’aceto in which vinegar’s antimicrobial properties are used to preserve pickled peppers and help ward off spoilage, this is not a canning recipe but rather a quick, “refrigerator” pickle recipe. The finished product must be stored under refrigeration. Mangia bene!
Ingredient Notes
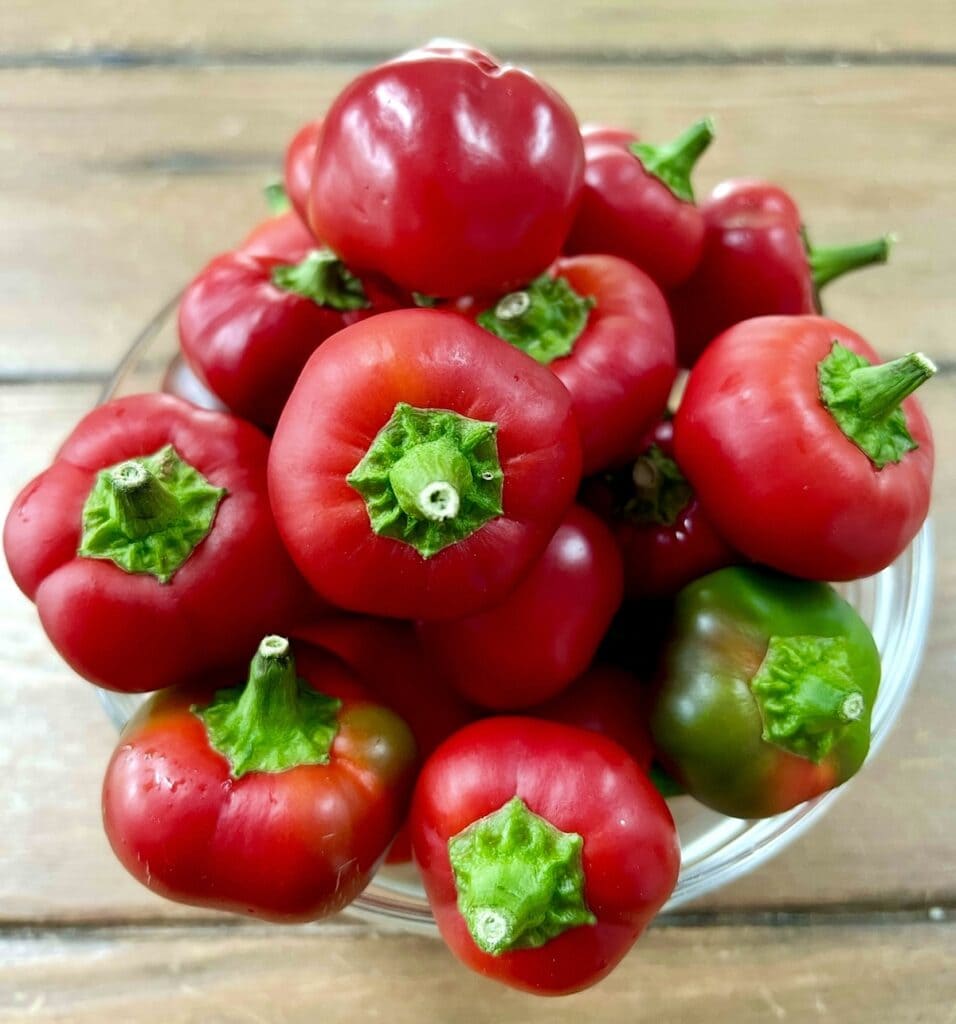
- Cherry Peppers: Make this recipe with red or green hot cherry bomb peppers, sweet cherry peppers (which are a bit more difficult to find) or any similarly sized pepper with a thick skin. Choose cherry peppers with smooth, firm skin and vibrant color. Avoid peppers that are shriveled, bruised or have soft spots. The stem should be green and firmly attached to the pepper.
- Water, Vinegar and Salt: Water, acid and salt are basic pickling ingredients. I use a combination of basic, distilled white vinegar, which has a very neutral flavor, and more flavorful white wine vinegar as the acid in this cherry pepper recipe to infuse a bit of la cucina Italiana into it. As for the salt, I almost always use sea salt in my cooking, but any salt will do.
- Aromatics: I kept it fairly simple here and included smashed garlic cloves, black peppercorns and bay leaves to infuse additional flavor into the pickling brine. You can also leave these out and just use the basic pickling solution of water, vinegar and salt if you want.

How to Make Pickled Cherry Peppers
- Gather all ingredients. Rinse the cherry peppers under cold water and pat them dry with a paper towel. Peel and smash the garlic cloves.
- You can pickle the cherry peppers either whole or seeded and cored. I have done both here.
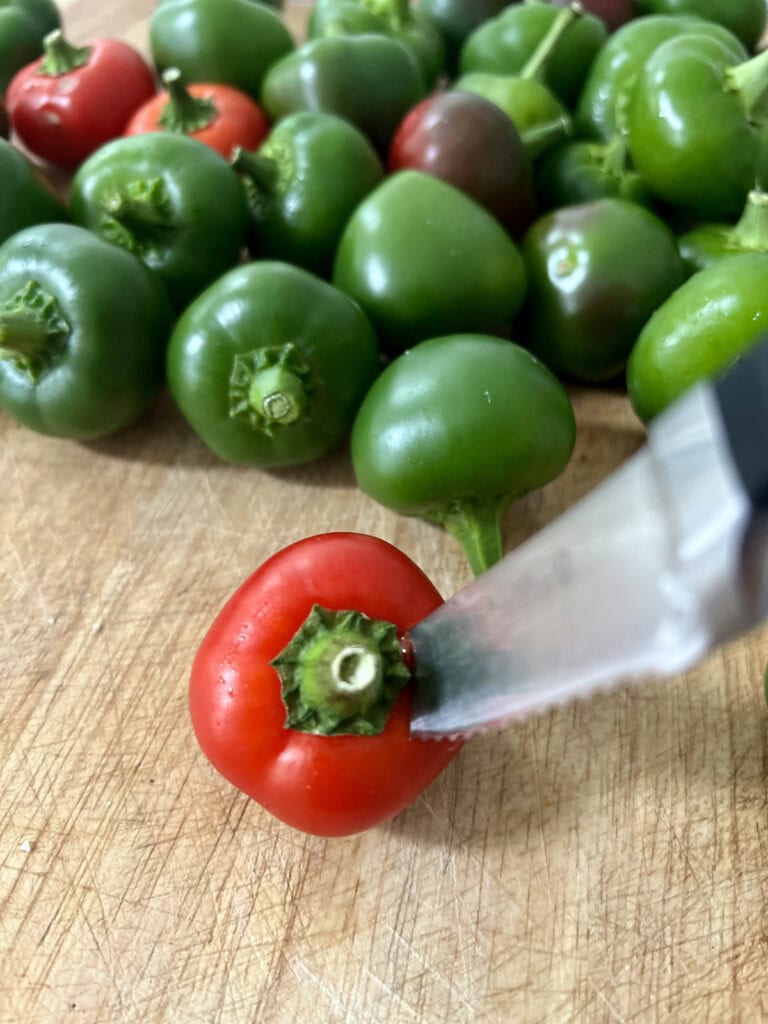
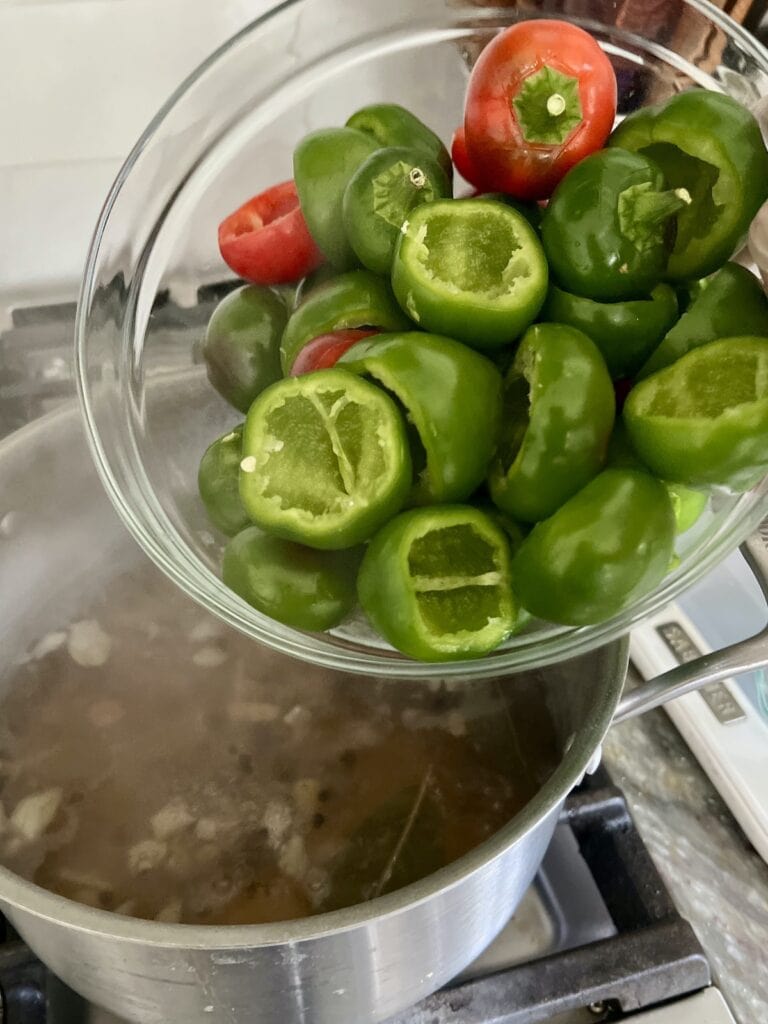
- If you’re leaving them whole, cut the stem down if it is long. Also, use the tip of a small knife to make 1 to 2 small slits in each pepper around the base of the stem so that the pickling liquid can enter the pepper a bit.
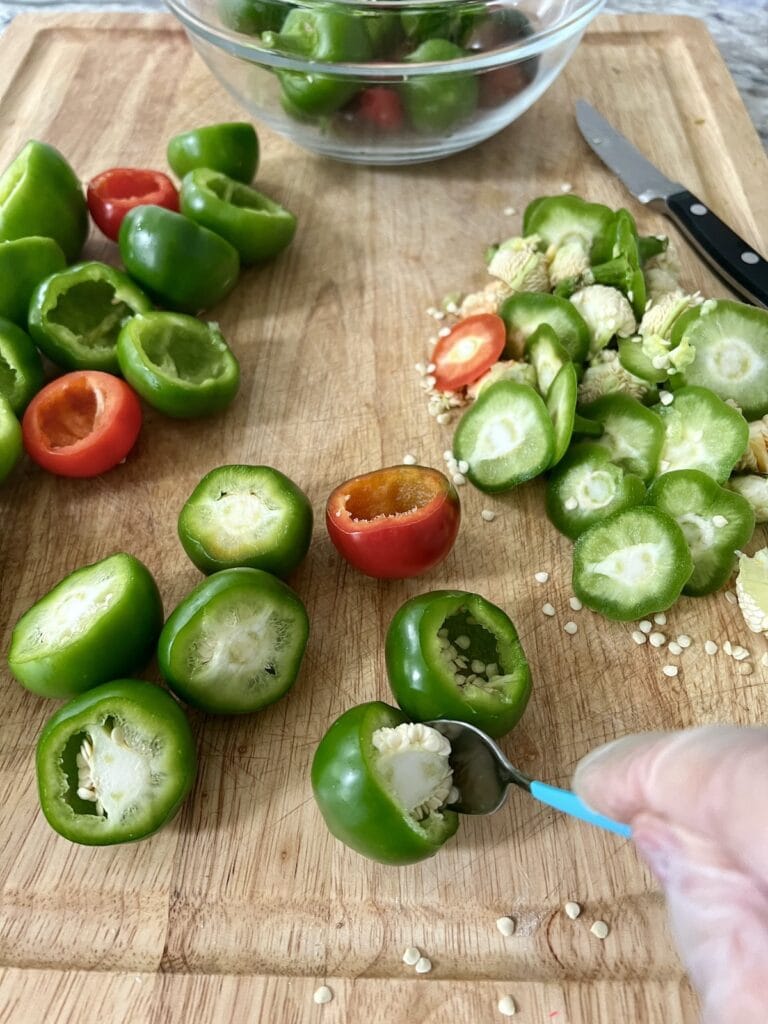
- If you prefer to core and seed the peppers, then use a small knife to remove the stem or cut off a small slice (including the stem) at the top of the pepper. Then, use a small spoon to remove the seeds.
- You can also slice the peppers after seeding and coring if you want.
Pro-Tip
Either wear gloves or be very careful not to touch the hot peppers and seeds with bare hands. If you do, definitely don’t touch your eyes or face afterwards! Trust me!

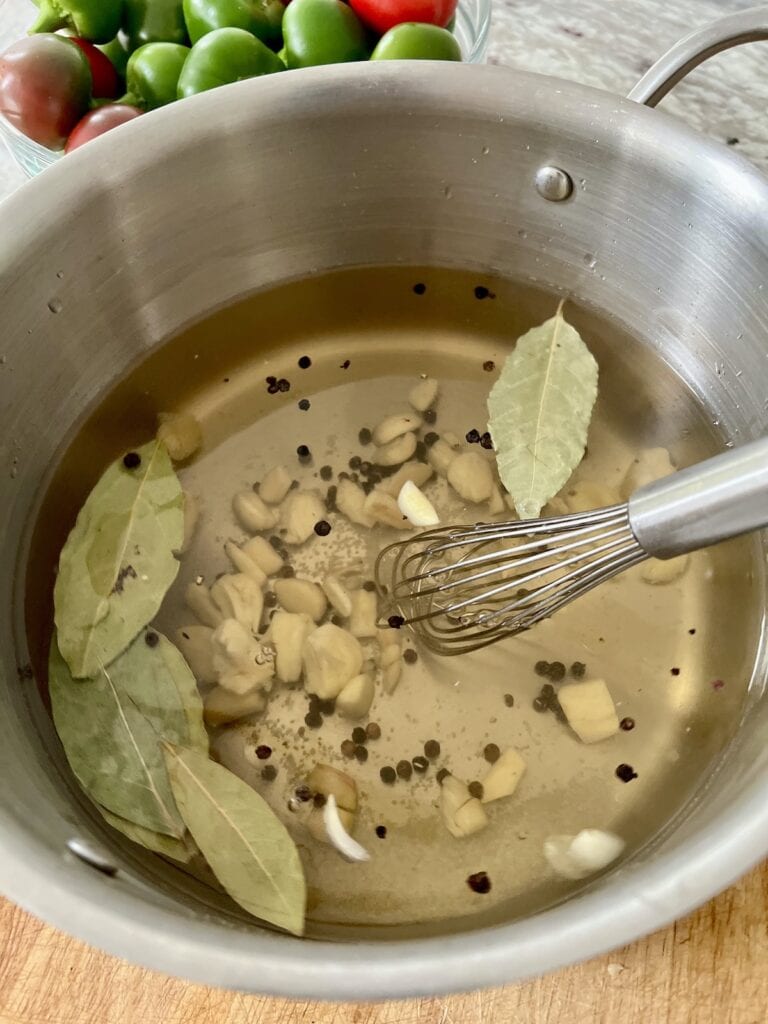
- Make the pickling brine by combining the two vinegars, water, salt, peppercorns, bay leaves and garlic in a pot or saucepan large enough to hold the liquid plus all the peppers.
- Heat the brine over medium-high heat and bring it to a boil, while whisking to dissolve the salt. Reduce the heat to a simmer and simmer the brine for about 5 to 7 minutes to allow the flavors to infuse.
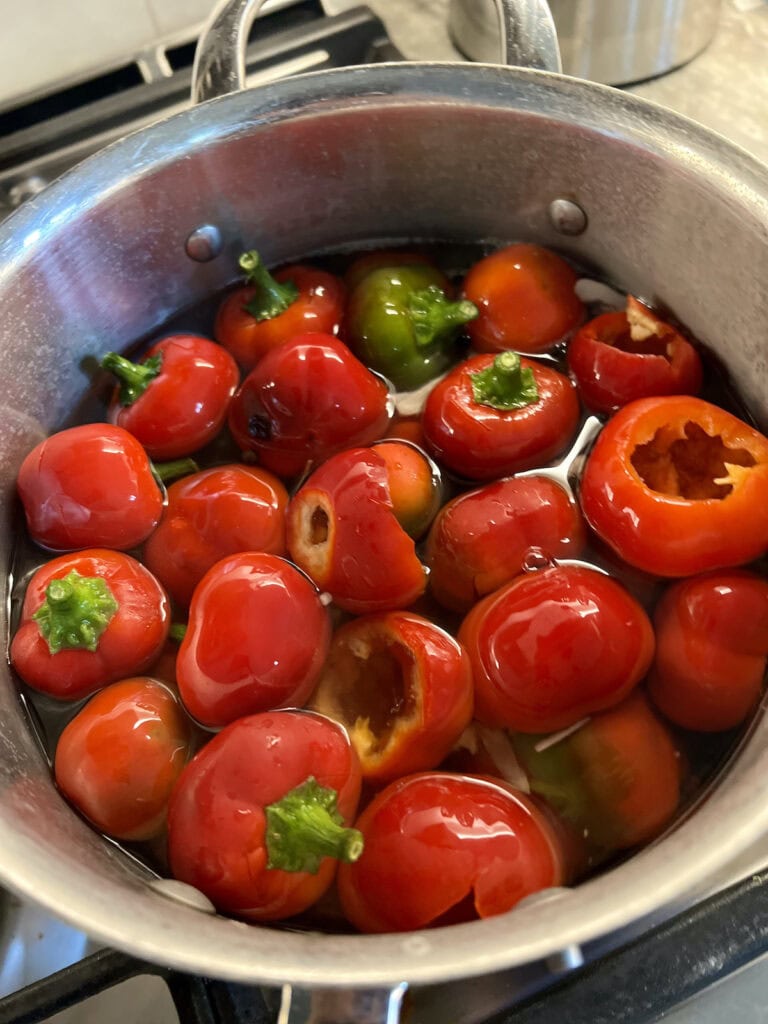
- Carefully add the peppers to the brine and stir. Bing the mixture back up to a simmer and simmer for about 5 minutes or until the peppers are tender but still firm. The peppers should not be soft or mushy.
- Remove the pot from the heat and let the mixture cool at room temperature for 15 to 30 minutes. Transfer the pepper and brine out of the pot and to a bowl if possible, for cooling.
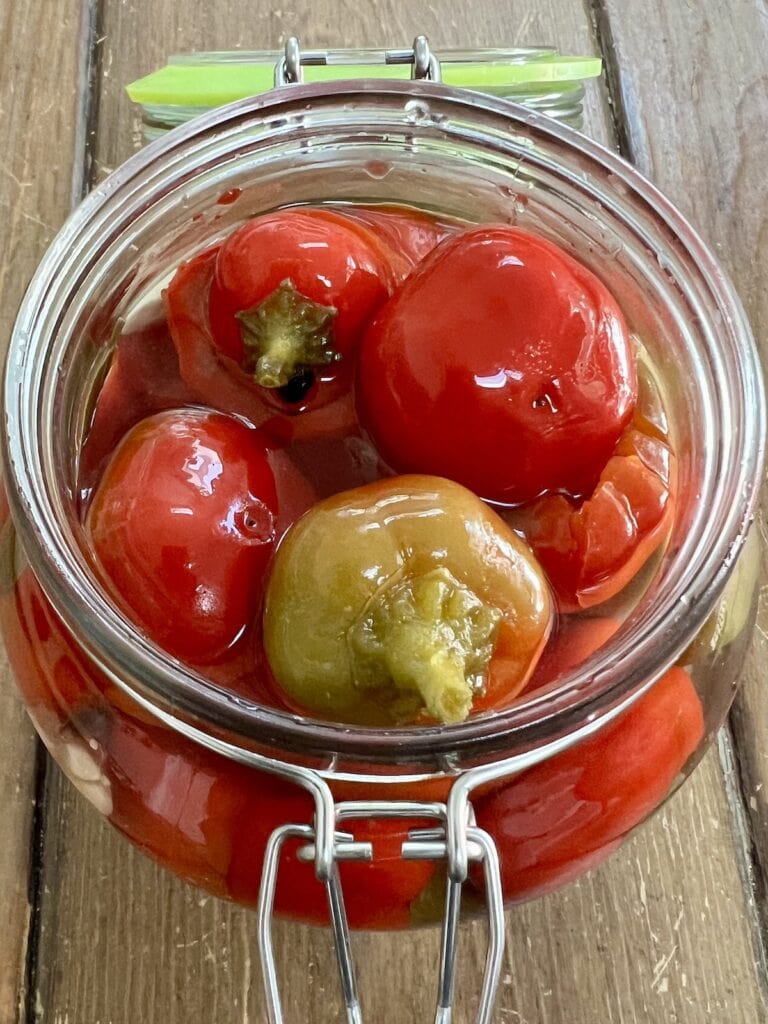
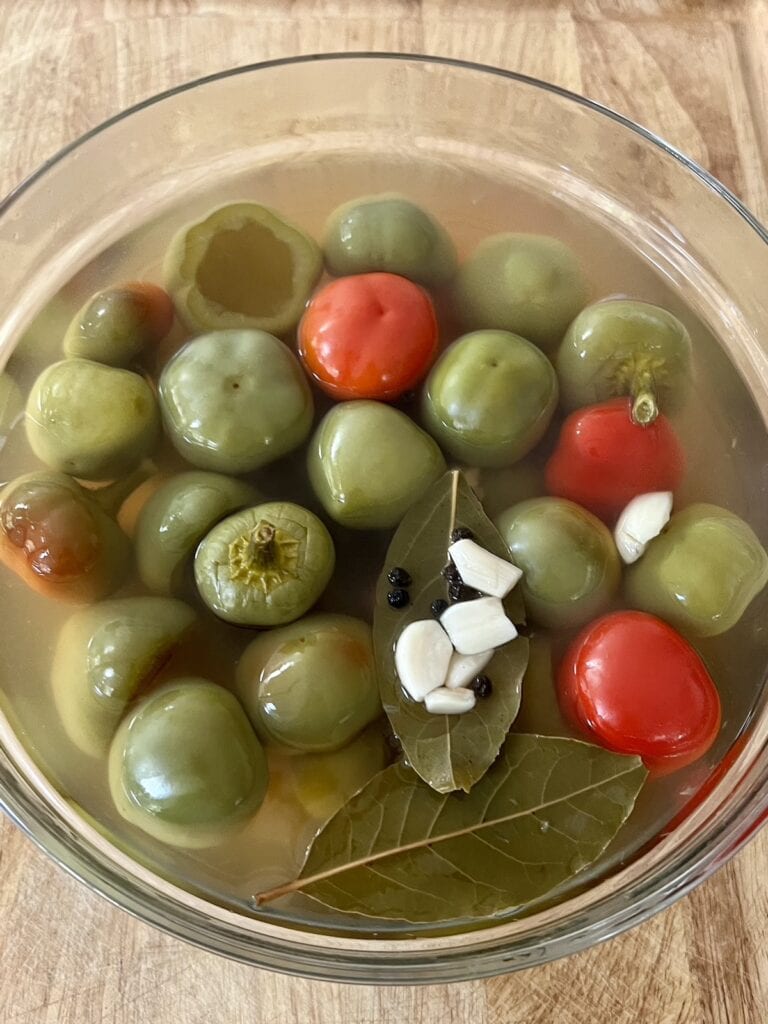
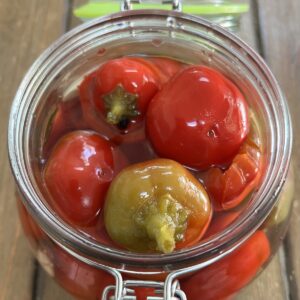
- Once the mixture has cooled a bit, transfer both peppers and brine to glass jars or containers, making sure the peppers are covered in brine. (Add a bit more vinegar if necessary.)
- Cover and store the pickled cherry peppers in the refrigerator. They are best after chilling about 24 hours and will last for at least one month under refrigeration. Use a slotted spoon or fork to remove them from jar or container as needed. That’s it!

How To Enjoy Pickled Hot Cherry Peppers
There are so many ways to enjoy Pickled Cherry Peppers, along with its hot briny pickling liquid.
I love adding them to so many types of sandwiches: chicken cutlet sandwich, Italian roast pork with broccoli rabe and sharp provolone cheese, meatball parm hero, any sub with Italian sausage, a classic Italian hoagie or even the most basic baked ham and cheese panino.
They can also amp up the flavor of a basic bowtie pasta salad, tortellini antipasto salad, puttanesca pasta and seafood dishes like spicy garlic shrimp, sautéed calamari or salt cod fritters (chop some up and add to the batter!). They also work great on a charcuterie or antipasto platter alongside fatty cured meats–they help offset the meats’ richness!
And, inspired by Italian American red sauce restaurants across the northeastern U.S., I’ll pair these vinegar peppers with pork chops or steak pizzaiola and even drizzle in a little of the spicy briny liquid like I do in shrimp arrabbiata pasta.
I’ll usually slice or chop the pickled hot cherry peppers before adding them to any dish and will include only some of the seeds since they are really hot!
Frequently Asked Questions
Cherry peppers are small, round chili peppers with a thick skin and mild-to-moderate heat level and sweet, slightly tangy flavor. With a Scoville heat unit (SHU) between 2500 and 500, they are similar in spiciness to a jalapeño pepper.
Cherry peppers are bright red when ripe but can also be harvested and enjoyed if green. They’re often confused with pimiento peppers, but are usually hotter and more round.
Due in large part to their firm, thick skin, cherry peppers are one of the most popular and best peppers to pickle, which is how you will almost always find them–on antipasto platters, salad bars and in sandwiches, among other dishes. They hold up well to pickling and can maintain a bit of a crunch.
Red cherry peppers are simply green peppers that were left on the vine longer to fully ripen. Like green bell peppers, green cherry peppers, which are harvested earlier than red, are generally more hot, tangy and pungent. Whereas fully-ripened red cherry peppers are a bit sweeter and richer with a slight fruity taste.
Both are hot, though! Truthfully, I use them interchangeably. When growing cherry peppers, I’ll general harvest them when red or almost red, unless it’s at the end of the season and I need to harvest them when green.
When I make pickled cherry peppers, I usually leave some whole and some cored and seeded. Either works and is really based on personal preference.
Whole peppers are more visually appealing, plus you’ll get a fun “burst” of brine and seeds (and heat!) if biting into it. (Much of the pepper’s heat is in the seeds, fyi.) But, they can be more challenging to pack into jars and the brine may not always reach the center of the pepper as easily.
Cored and seeded pickled hot cherry peppers are less piccante, more convenient and ready to stuff or slice and add quickly to a sandwich or recipe. (Be sure to also remove any bitter membranes before pickling.) You can also slice them before pickling if you want.
If you want to leave them whole, just be sure to poke a few holes or make a small slit at the top of the pepper near the stem. This way, the pickling brine can penetrate the pepper more effectively and result in better flavor and texture.
Of course! You’ll find cherry peppers pickled more than any other way because its thick and fibrous skin makes them ideal for pickling.
But you can certainly roast them, like long hot peppers, or fry them, like Italian sweet frying peppers. My Calabrese Uncle Dominic used to eat whole fried cherry peppers by the forkful. He had a stomach of steel!
I like to dice up fresh cherry peppers and sauté them as part of the base in my sautéed calamari and arrabbiata sauce recipes.
I even dehydrate a bunch every summer (with seeds), then eventually grind them to use as my crushed red pepper spice (it has incredible flavor!) or to turn into a really delicious olio santo (spicy pepper oil).
If properly stored in the refrigerator in an airtight container, the pickled peppers will last for at least one month. These peppers do not freeze well.
Recipe Variations and Substitutions
You can actually use this basic pickling recipe for other similar hot peppers like serrano and jalapeño.
And, while I kept this recipe fairly basic, you can always add in some other aromatics like shallots, thyme, dried or fresh oregano (or your favorite herbs and spices).
And, if you prefer a bit of sweetness, apple cider vinegar may be a good option for some or all of the vinegar in the recipe. Some balsamic vinegar or even a touch of sugar can be added as well.
Quick Pickled Cherry Peppers
Video
Equipment
- Glass Containers with Lids (optional)
Ingredients
- 2-2½ pounds hot cherry peppers
- 4 cups distilled white vinegar
- 2 cups water
- 1 cup white wine vinegar
- 1 head garlic, cloves peeled and crushed with back of a knife
- 4 tsp salt
- 2 tsp black peppercorns
- 3-5 bay leaves
Instructions
- Gather all ingredients. Rinse the cherry peppers under cold water and pat them dry with a paper towel.(Please see the section above in the blog post for Step-By-Step instructions with photos.)2-2½ pounds hot cherry peppers
- You can pickle the cherry peppers either whole or seeded and cored. I have done both here. (See above for more information on the different options.) –If you’re leaving them whole, cut the stem down if it is long. Also, use the tip of a small knife to make 1 to 2 small slits in each pepper around the base of the stem so that the pickling liquid can enter the pepper a bit.–If you prefer to core and seed the peppers, then use a small knife to remove the stem or cut off a small slice (including the stem) at the top of the pepper. Then, use a small spoon to remove the seeds.–You can also slice them after coring and seeding if you want.NOTE: Either wear gloves or be very careful not to touch the hot peppers and seeds with bare hands. If you do, definitely don’t touch your eyes or face afterwards! Trust me!
- Make the pickling brine by combining the two vinegars, water, garlic, salt, peppercorns and bay leaves in a pot or saucepan large enough to hold the liquid plus all the peppers.4 cups distilled white vinegar, 2 cups water, 1 cup white wine vinegar, 1 head garlic, 4 tsp salt, 2 tsp black peppercorns, 3-5 bay leaves
- Heat the brine over medium-high heat and bring it to a boil, while whisking to dissolve the salt. Reduce the heat to a simmer and simmer the brine for about 5 to 7 minutes to allow the flavors to infuse.
- Carefully add the peppers to the brine and stir. Bring the mixture backup to a simmer and simmer for about 5 minutes or until the peppers are tender but still firm. The peppers should not be soft or mushy.
- Remove the pot from the heat and let the mixture cool at room temperature for 15 to 30 minutes. Transfer the pepper and brine out of the pot and to a bowl if possible, for cooling.
- Once the mixture has cooled a bit, transfer both peppers and brine to glass jars or containers, making sure the peppers are covered in brine. (Add a bit more vinegar if necessary.)
- Cover and store the pickled cherry peppers in the refrigerator. They are best after chilling about 24 hours and will last for at least one month under refrigeration. Use a slotted spoon or fork to remove them from jar or container as needed. Buon Appetito!
Notes
- The pickled peppers are best after about 24 hours in the refrigerator.
- If properly stored in the refrigerator in an airtight container, the pickled peppers will last for at least one month. These peppers do not freeze well.
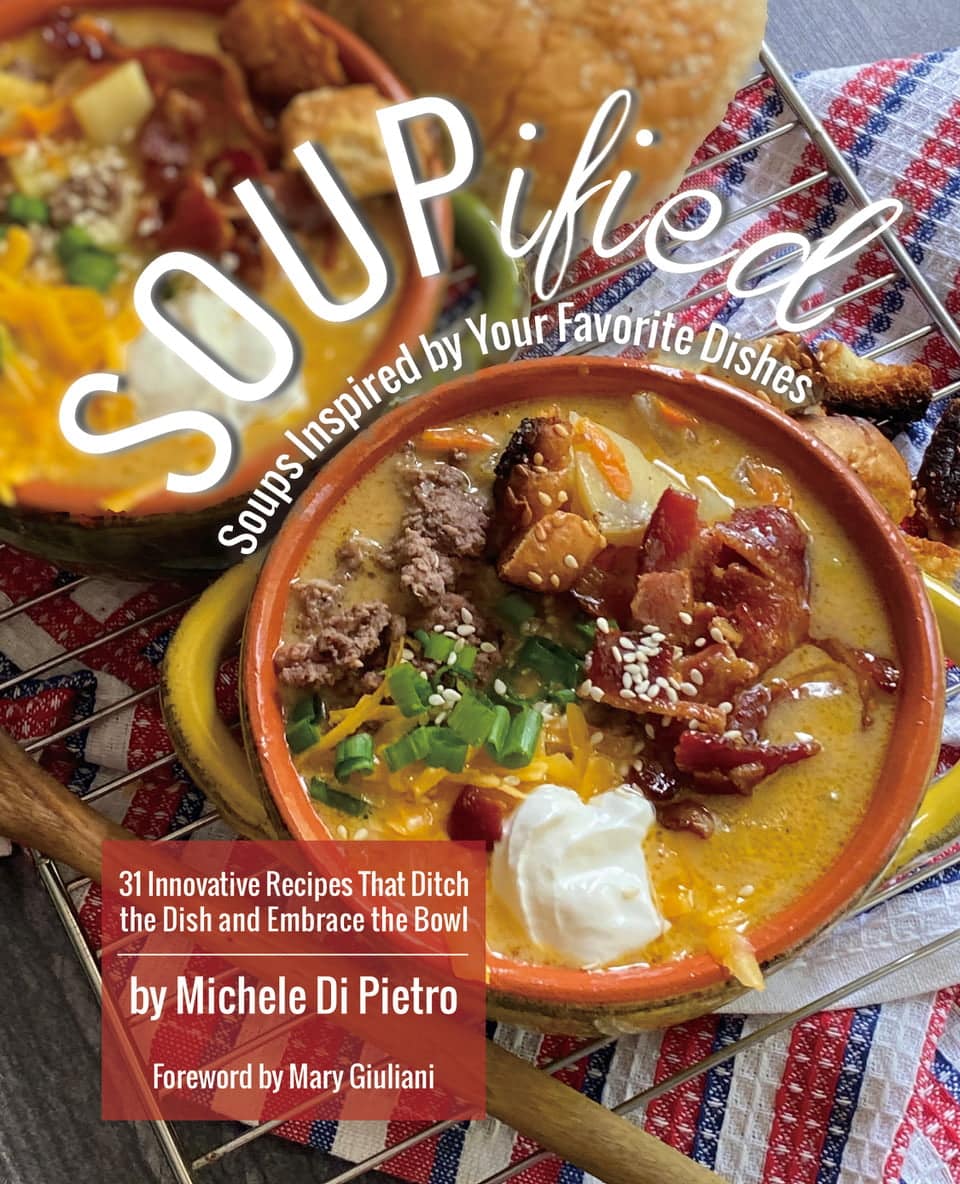
love soup?
Get My Cookbook!
Ditch the dish and embrace the bowl with Soupified: Soups Inspired by Your Favorite Dishes!
Available in ebook, paperback and hardcover.
These add just the right touch of briny-ness and heat to so many dishes!