This post may contain affiliate links or sponsored content. That means if you click on my link and buy something, I will earn a small commission from the advertiser at no additional cost to you. For more information, see our disclosure policy.
Making a Thanksgiving Roast Turkey should not be as intimidating as it often is! True, it is a once-a-year endeavor for many and the pièce de resistance of a very important annual get-together. But, by focusing on prepping and cooking TECHNIQUE, as opposed to hard-and-fast recipe specs, you can quickly and easily master the task with confidence and success. Read on for my overview of the most important considerations and steps in making your next Thanksgiving Roast Turkey.
Type and Size of Turkey
There are so many thorough resources out there about the different types of turkey available. I understand that the choices could make even the initial thought of what to order a bit overwhelming. My simple tips based on personal experience (and sixteen years working in the natural foods industry) are as follows:
- Buy an anti-biotic free, all-natural turkey, if possible. (“All-natural” generally means that the turkey contains no additives and is minimally-processed.)
- Buy local, if you can.
- Consider a free-range and/or heritage breed for more authentic turkey flavor.
- Figure about 1½ to 2 pounds turkey per person. The reality is that guests often don’t eat a lot of turkey, given all the other sides, starters and desserts. But, I am of Italian-American blood and, therefore, there is not enough food if there isn’t any leftover. Enough said.
- In general, I prefer turkeys that are 12 to 14 pounds, at the most. Larger turkeys take much longer to cook and tend to become drier during the roasting process. In fact, I recommend cooking two smaller birds instead of one very large bird.
Fresh vs. Frozen Turkeys and Defrosting
Fresh turkey are always preferred, if possible, as freezing creates ice crystals, decreases overall moisture, and potentially impacts the quality of the finished, cooked meat.
A wrapped, fresh turkey will last several weeks, under proper refrigeration once packed. Therefore, feel comfortable purchasing one a couple weeks in advance of the big meal. Just be sure to check its packing date. However, once the turkey is unpackaged, cook it within three days. Store a frozen turkey in your freezer for up to three months.
If you do buy a frozen turkey, don’t forget to give yourself plenty of time (i.e., several days) to defrost it! For important food safety purposes, defrost the turkey under refrigeration, not by sitting it out on the counter at room temperature. I suggest placing the frozen turkey at the bottom of the fridge on a sheetpan to capture residual moisture. As a point of reference, a 12 to 14 pound frozen turkey will take 3 to 4 days to defrost in the refrigerator.
Having said this, if you are desperate and need to defrost your turkey quickly, place it in a large tub of very cold water. Then, change out the water ever 90 minutes. This will speed up the defrosting process to about 12 hours.
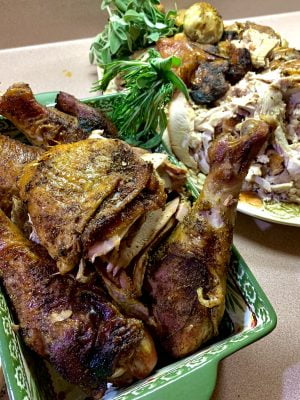
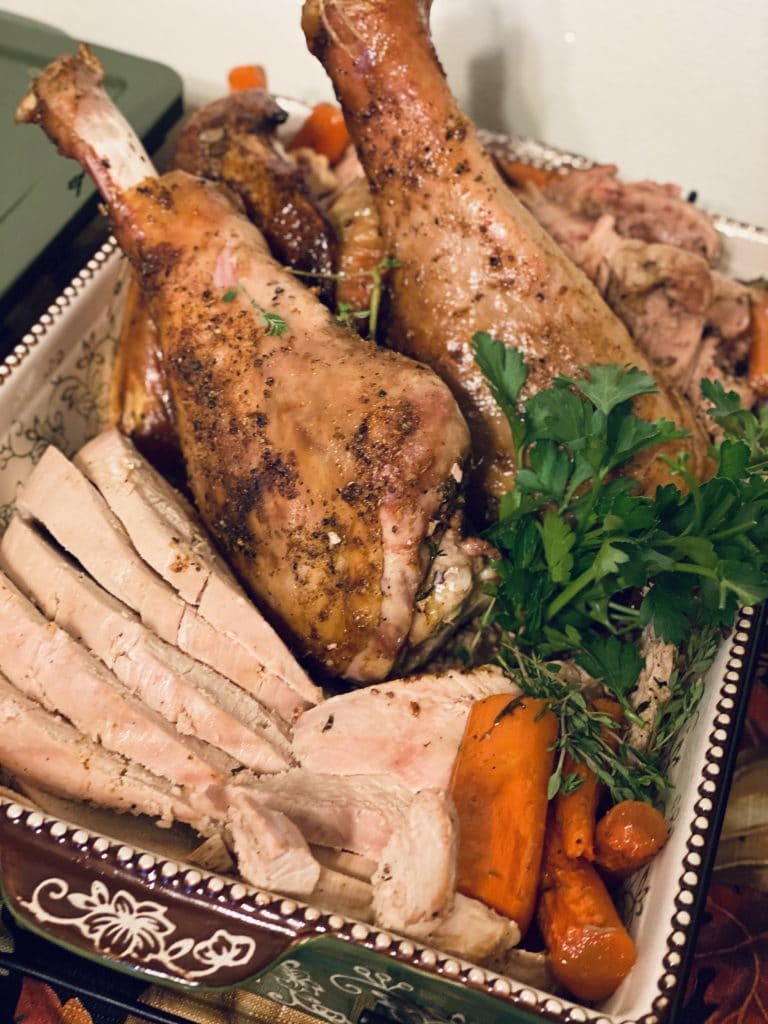
Cook the Turkey Whole, in Parts, or Spatchcocked?
I love cooking turkeys all three of these ways. Still, if you are new to hosting Thanksgiving dinners and want to manage your stress level, I truly believe that cooking a turkey in parts is the best way to go.
Why?
Well, practically speaking, different parts of the turkey take different lengths of time to cook. Turkey breasts cook faster than turkey legs and thighs. This fact alone makes it inherently difficult to cook a whole turkey properly, i.e., with a moist and not-overcooked breast.
There are techniques to mitigate a dry turkey breast. These include injecting, brining, basting, cooking the turkey breast-side down, cooking at an initial high temperature and tenting the turkey with foil. But, you will have less to worry about if you cook the turkey in parts. Plus, it will take much less time to roast!
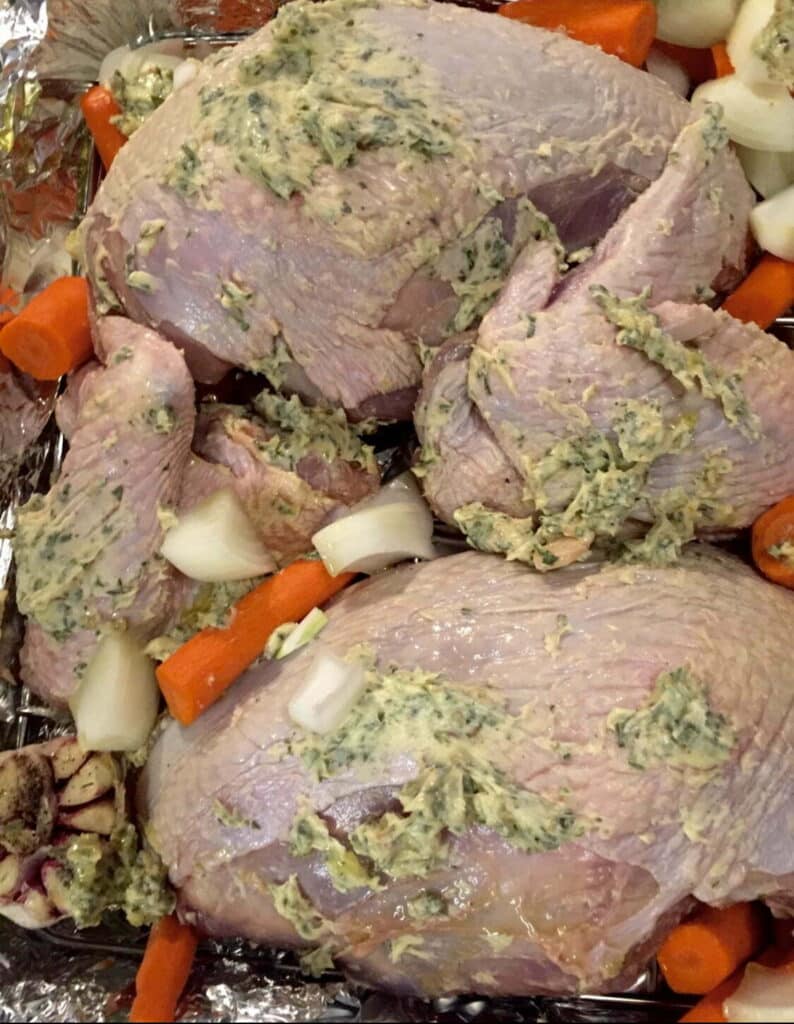
In order to avoid having to break down the turkey yourself, ask your butcher to cut it into eight parts. Then, cook the legs and thighs in one roasting pan and the breasts and wings in a separate pan. This ensures that each part of the turkey will only cook as long as necessary and remain moist.
As for spatchcocking, if you have the oven space–go for it! Spatchcocking refers to a turkey that has had its backbone removed and is flattened out. It is very similar in outcome to cooking the turkey in parts, resulting in even cooking, moister meat, and crispier skin due to more skin surface area being exposed. It also takes much less time to roast–about 50% less time than a whole turkey! Plus, you have the added bonus of the turkey backbone being available to make stock and gravy in the days leading up to Thanksgiving, if you are so inclined. Be sure to ask your butch to do the spatchcocking for you. You can definitely do it yourself , though, if you have strong hands!
Wet Brines and Dry Brines
I am definitely pro-brining, but I do not always brine. The reasons usually relate to not enough refrigerator space and not always wanting to do one more thing. Quite honestly, you can have a super-moist and delicious roast turkey without brining, assuming that you have purchased a quality bird, seasoned it well, and practiced overall proper cooking techniques. But, there is no doubt that brining does, indeed, make for juicier meat, as a wet brine can decrease the amount of total moisture loss during cooking by 30 to 40%!
Wet Brines
So, brining is really all about SALT. Brining gets the salt into the meat of the bird so that it has more flavor & retains more moisture, creating a less dry turkey overall. At its most basic form, a (WET) BRINE = SALT + WATER, but most brines also have some SUGAR as well, which helps with the caramelization of the meat.
But, all you REALLY need to brine your Thanksgiving Roast Turkey is salt and water. That, and a large stock pot, container or brining bag (+ room in your fridge!) because the turkey needs to be 100% submerged in the salty liquid for, ideally, 24 to 48 hours under refrigeration.
If you use a wet brine, on Thanksgiving morning, remove the turkey from the brine, rinse it and then let it dry uncovered in the refrigerator for 1 to 2 hours prior to prepping it for roasting. This drying process of the turkey will help to ensure crispy, golden skin.
Dry Brines
Dry brining is an easier and more space-efficient method than wet brining, and many think that it results in a moister, less watered-down turkey. Without getting too technical, dry brining basically refers to the process of salting the entire surface of the turkey, then resting it before cooking. It achieves the same goal as wet brining, i.e., highly-seasoned and juicy meat, without the potential water-logging from a wet brine.
To summarize, both a wet or dry brine will definitely enhance your turkey’s moistness and are well-tested, tried and true culinary techniques. Having said this, neither is absolutely necessary. Proper seasoning and cooking technique, most notably using a meat thermometer to ensure that you don’t overcook your turkey, is key and really all that you need for a delicious Thanksgiving Roast Turkey.
How to Season the Turkey
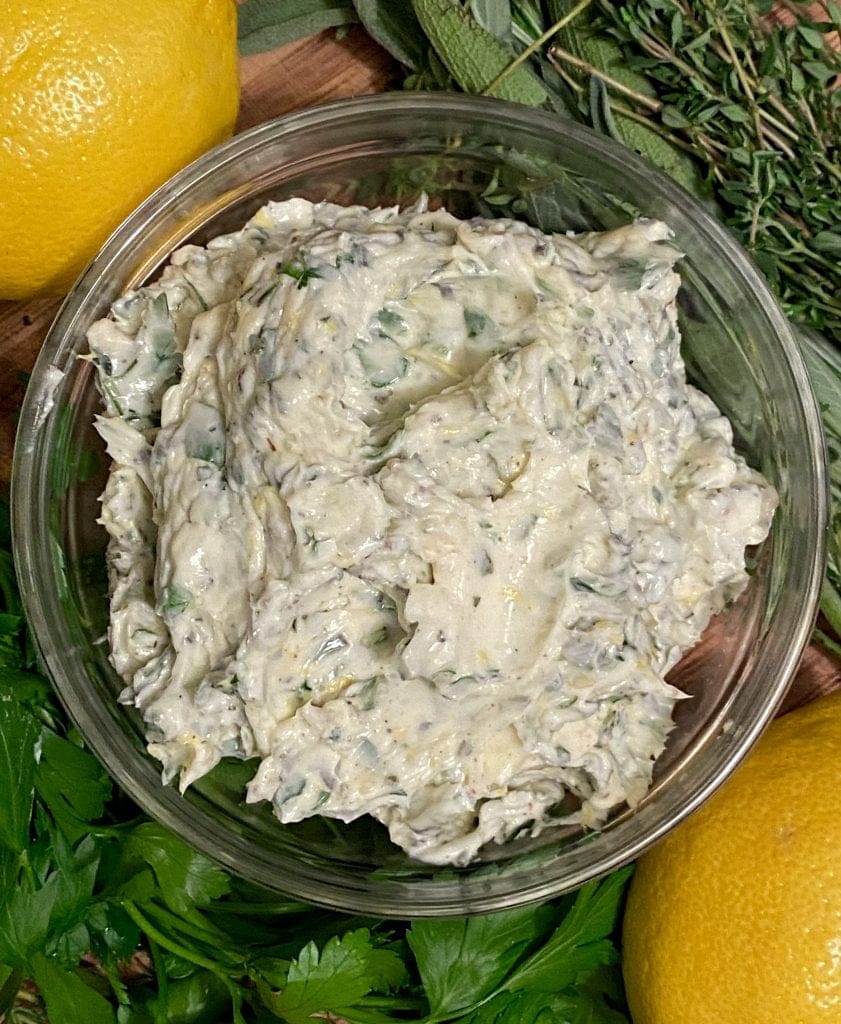
Seasoning the turkey comes down to three words in my humble opinion–butter, aromatics and salt.
First, generously slather a flavor-forward, compound butter, such as this Lemon Herb Butter, all over the outside surface of the turkey and also under the breast skin. Put a couple dabs in the turkey cavity as well.
Then, liberally sprinkle salt and black pepper all over the surface and inside the cavity. (NOTE: If you have brined the turkey, you can skip this step.)
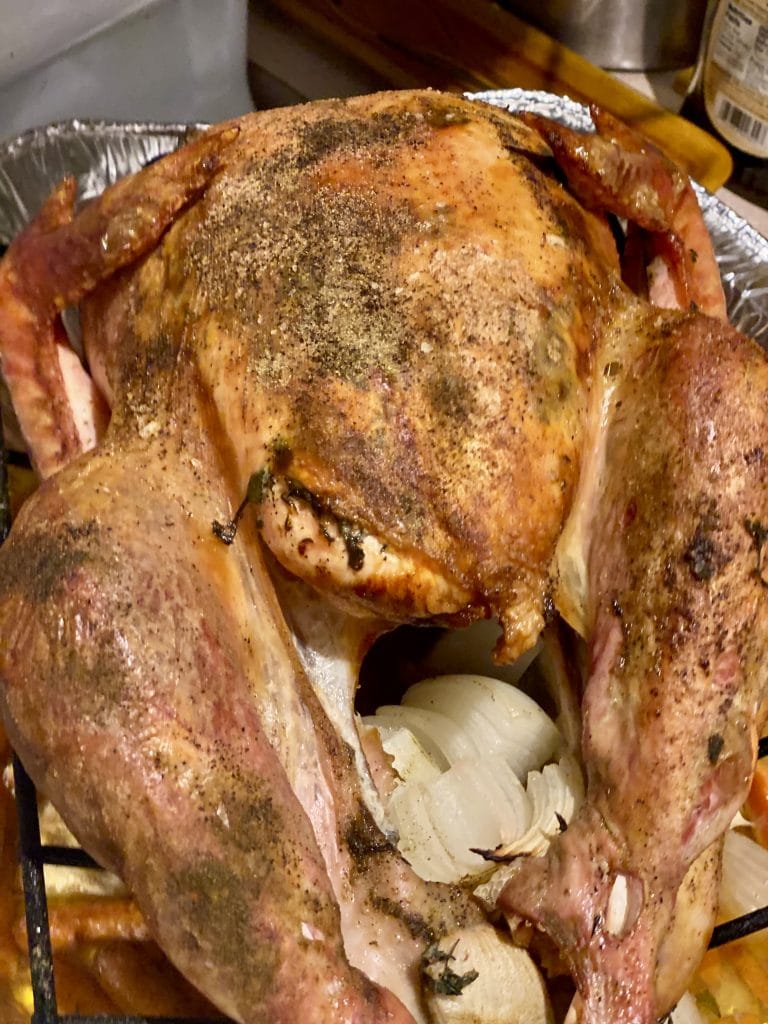
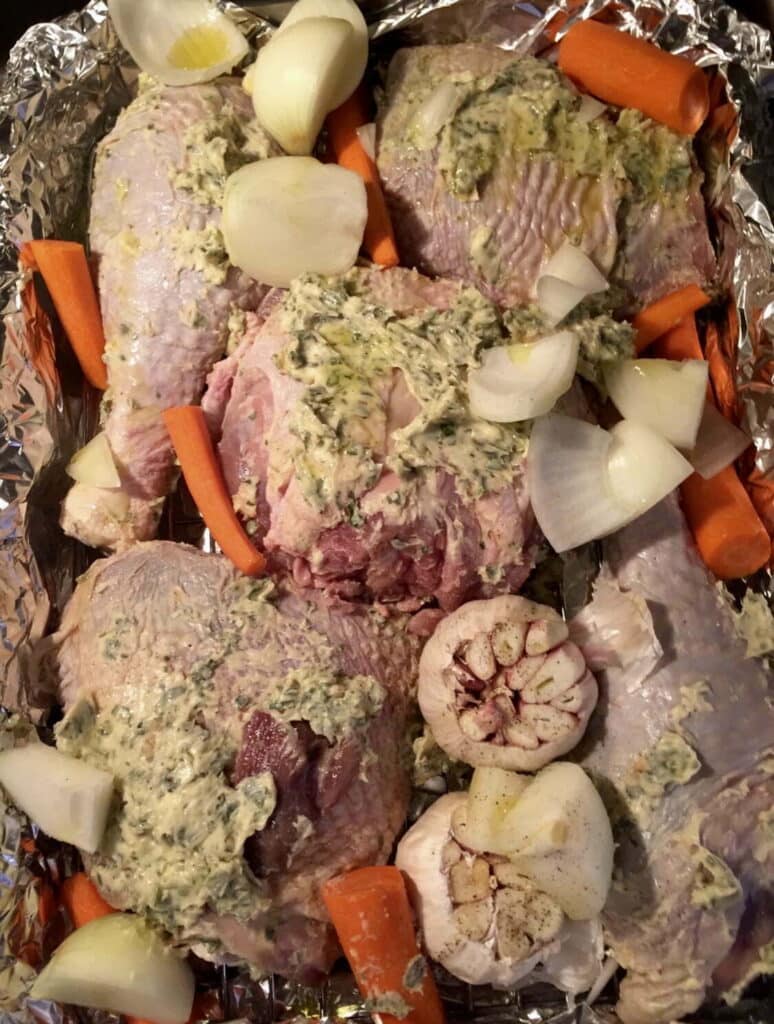
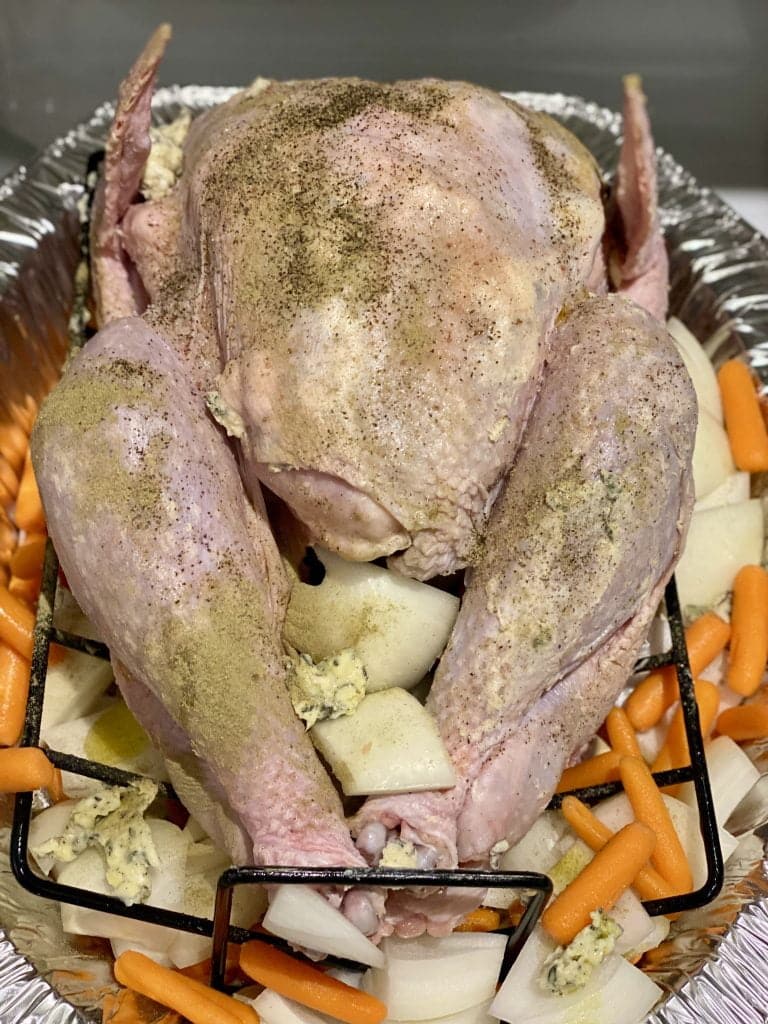
Finally, stuff the turkey cavity with large chunks of onion, carrot and celery, as well as garlic cloves, whole herb sprigs and a cut up lemon or two. Then put another few dabs of butter in the cavity. These aromatics placed inside the cavity are basically flavoring agents and not a traditional stuffing. As the turkey slowly roasts, these ingredients will infuse their flavor into the meat and drippings, creating more overall flavor in the finished product (and also a very flavorful Turkey Gravy!)
If desired, place these same aromatics, plus some large piece of potatoes, in the space around the turkey in the roasting pan. They will become so flavorful as they naturally baste in the turkey’s juices during the roasting process!
Some Additional Technical Turkey Cooking Information
Here are some final, important tips for making the perfect Thanksgiving Roast Turkey. Keep in mind that these tips apply whether you are roasting a whole turkey, a spatchcocked turkey, or turkey parts.
- Bring the turkey to room temperature before roasting.
- It’s best to roast the turkey on a rack. A rack lifts the turkey away from the direct heat of the pan and allows hot air to circulate underneath. As a result, the turkey will cook more evenly and tend to develop a crispier skin. And, there is less risk of undesirable, soggy skin.
- Don’t forget to remove the neck and giblets from inside the turkey’s cavity!
- Tie the turkey legs together with butcher’s twine and tuck the wing tips under the body to prevent burning.
- Begin by roasting the turkey, uncovered, at a high temperature (425-450°F) for about 30 minutes to brown and crisp the skin and seal in juices, similar to searing a steak. You’ll need to keep a very close eye on the bird during this time so that it does not burn!
- Then, loosely cover the roasting pan with tented aluminum foil and decrease the oven temperature to 350°F for the remainder of the cooking process. The turkey will now roast on the inside slowly at the lower temperature, retaining a lot of its juices and staying moist during the process.
- Baste the turkey as it cooks–if you want; basting is definitely not necessary. Contrary to public opinion, basting will not add moisture to the meat itself, but it will help it to cook more quickly. In addition, while it will add more flavor to the surface of the meat, it may create uneven browning.
- Use a meat thermometer to indicate when the turkey is done. A turkey (or chicken) is finished cooking when it has reached an internal temperature of 165°F. Because of carryover cooking time, i.e., the length of time during which the internal temperature of the turkey continues to rise once it is removed from the oven, you can remove the turkey from the oven once it has reached an internal temperature of 155-160°F. Then, let it sit, covered, on the counter until the required internal temperature has been reached.
- A good rule of thumb is that a turkey takes about 12 to 15 minutes to cook per pound. However, this is just an estimate and will depend on different factors, such as whether you initially roasted the turkey at a high temperature and if it is covered or uncovered. In addition, I have always found that all-natural and organic turkey cook faster than conventional turkeys.
- The only foolproof way to know when your turkey is finished cooking is to use a meat thermometer. Take the temperature a few times as the turkey is roasting so that you can monitor its progress.
- To take the turkey’s temperature properly, insert the meat thermometer into the thickest part of the bird–where the thigh and leg meet–if roasting it whole. Stop before touching the bone. This is the part of the turkey that takes the longest to cook, so taking the temperature in this spot is very important.
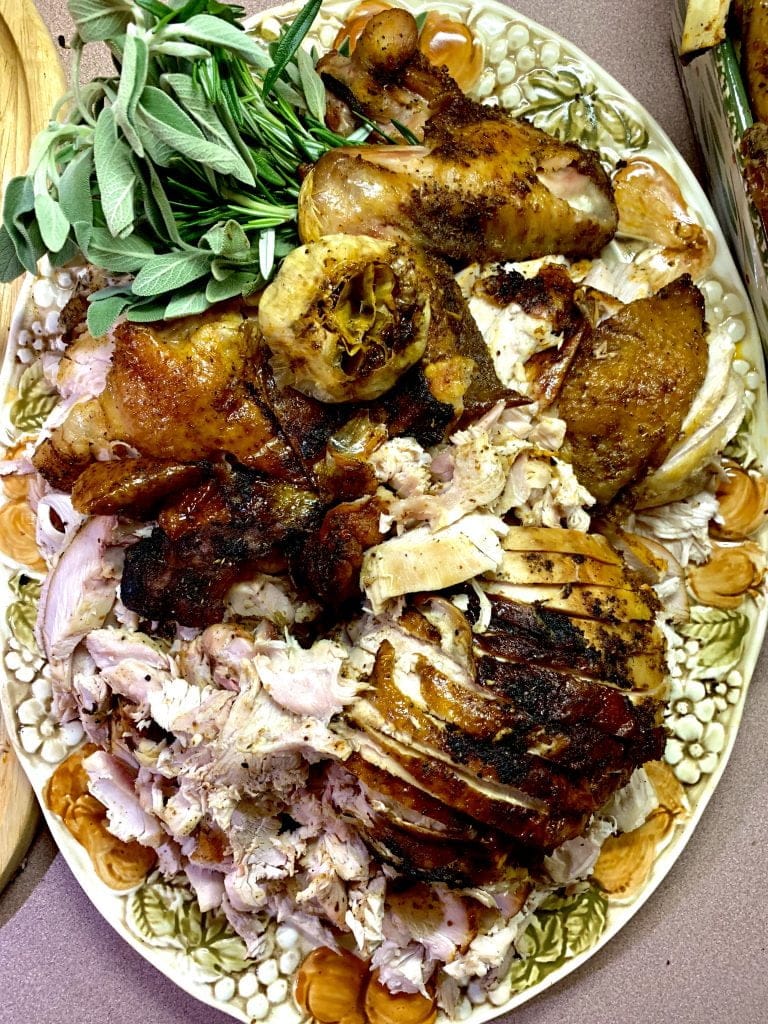
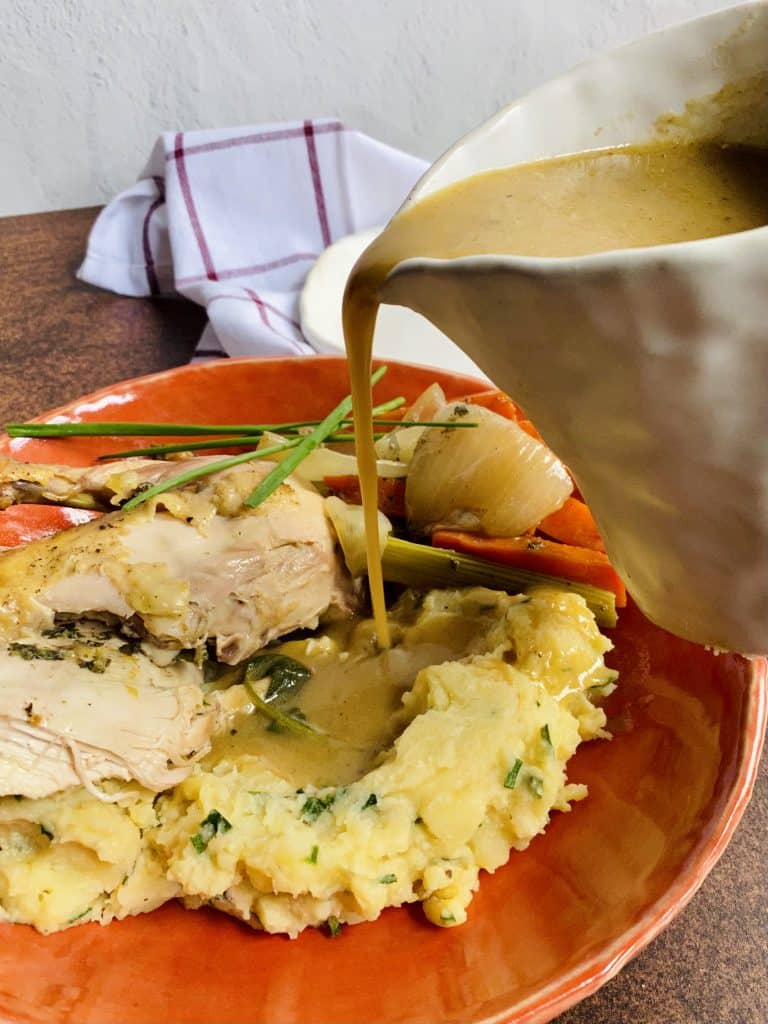
- Once the turkey is done, let it rest before carving. Just like any other piece of meat, resting allows the turkey to retain its natural juices better upon slicing, resulting in moister meat. At least 20 to 30 minutes resting time is recommended before carving–the perfect amount of time to make Turkey Gravy and/or get the gang around the table.
- How to carve a whole turkey? Well, until I get a chance to record a video to show you how to do this properly, I’ll recommend this great resource here.
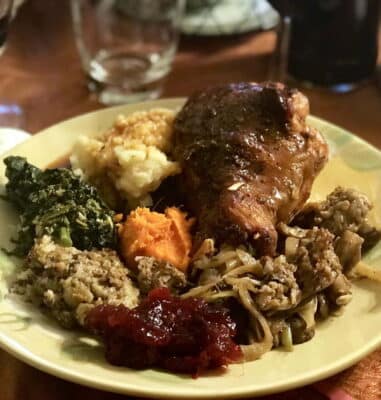
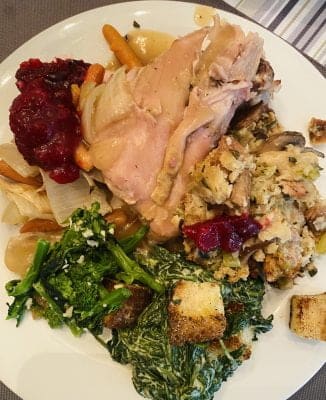
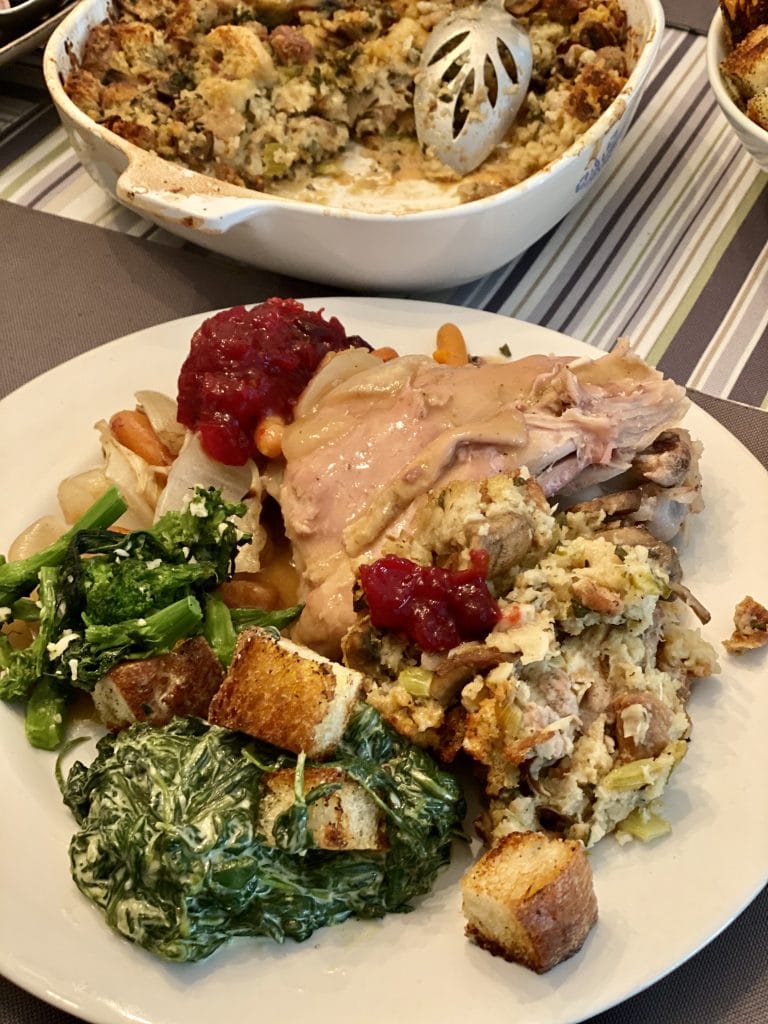
What to Serve With Thanksgiving Roast Turkey
Round out your Thanksgiving Roast Turkey with these delicious, classic trimmings and new favorites:
- Homemade Turkey Gravy
- Thanksgiving Stuffing with Sausage and Mushrooms
- Easy Stovetop Cheddar Mac and Cheese
- Roasted Garlic Mashed Potatoes
- Creamed Spinach with Croutons
- Cranberry Sauce with Orange
- Raw Cranberry Pomegranate Relish
- Aperol Spritz Cranberry Sauce
- Nutty Cranberry Sauce with Cognac
- Cranberry Apple Sauce with Marsala
Kitchen Tools & Cookware for Thanksgiving Roast Turkey
To make this Thanksgiving Roast Turkey recipe, you will need the following:
- Measuring cups and spoons
- Multiple bowls to hold prep
- Cutting board with non-slip mat underneath (I use shelf liner)
- Sharp chef’s knife
- Butcher’s twine
- Baster
- Basting brush
- Roasting pan with rack
- Aluminum foil
- Stem thermometer
- Oven mitts
- Large spoon
- Carving knife and fork
- Serving platter and serving utensils
I hope that you are enjoying my Italian food blog Mangia With Michele and all of my Italian recipes and Italian-American recipes!
If you’ve tried this recipe or any other recipe on the blog, please let me know how it went in the comments below — I love hearing from you!
You can also FOLLOW ME on FACEBOOK and INSTAGRAM to see more delicious food and what might be going on behind the scenes!
Thanksgiving Roast Turkey

Ingredients
- 1 12-14 pound whole turkey, , neck and giblets removed
- about 2 cups Herb Butter, (See separate recipe.)
- Salt and black pepper
- 2-3 large yellow onions, , cut into 1" chunks
- 2-3 large carrots,, peeled and cut into 1" chunks
- 4-5 ribs celery, , cut into thirds
- 1-2 lemons, , quartered
- 1-2 heads garlic,, about ½” of the top sliced off
- 4-5 sprigs assorted herbs, (sage, marjoram, rosemary and/or thyme)
- 1-2 cups low-sodium chicken broth or water
Instructions
- If the turkey has been wet-brined, remove it from the brine, rinse it and then let it dry uncovered in the refrigerator for 1 to 2 hours prior to prepping it for roasting.
- Arrange a rack in the lower third of the oven and preheat the oven to 425°F.
- Double-check that the giblets and neck have been removed from the turkey cavity.
- Pat the turkey dry with paper towels. Then, slather the Herb Butter generously over the entire surface area of the turkey and under the breast skin. Place some Herb Butter in the turkey cavity as well.
- Next, sprinkle the same area liberally with salt and black pepper. You can skip the salt if the turkey has been brined.
- Stuff the cavity with onions, carrots, celery, lemons and herbs. Add more Herb Butter on top of these aromatics. Then, arrange a garlic head, cut side up, at the mouth of the cavity.
- Tie the turkey legs together with butcher’s twine and tuck the wing tips under the body to prevent burning. Arrange the turkey breast-side-up on a rack fitted inside a roasting pan or on a sheet pan.
- If desired, sprinkle the remaining aromatics and garlic heads around the turkey in the roasting pan.
- Transfer the roasting pan to the oven and roast the turkey, uncovered, for about 30 minutes or until the skin is crispy. Monitor the turkey closely during this first step so that it does not burn.
- Then, pour about 1 cup broth or water into the pan and loosely cover the pan with tented aluminum foil. Reduce the oven temperature to 350°F and continue roasting the turkey until it reaches an internal temperature of 165°F. To take the turkey’s temperature properly, insert the meat thermometer into the thickest part of the bird–where the thigh and leg meet if roasting it whole. Stop before touching the bone. This is the part of the turkey that takes the longest to cook, so taking the temperature in this spot is very important.
- Add additional broth or water to the pan if necessary (i.e., if the liquids in the pan dry up) during the roasting process.
- In terms of total roasting time, a good rule of thumb is that a whole turkey takes about 12 to 15 minutes to cook per pound. However, this is just an estimate and will depend on different factors, such as whether you initially roasted the turkey at a high temperature and if it is covered or uncovered. In addition, I have always found that all-natural and organic turkey cook faster than conventional turkeys. For a 12-14 pound turkey, it could take anywhere from 2.4 to 3.5 hours. Keep an eye on the turkey and start taking its internal temperature after 2 hours to closely monitor its progress.
- Once the turkey is finished cooking, remove it from the oven and let it rest on the counter for 20 to 30 minutes, covered, prior to carving.
- Slice the turkey and enjoy the fruit of your efforts. Buon Appetito!
Notes
- This recipe should be considered a guideline to follow, as amounts and cooking times will vary based on the turkey type, turkey size, turkey preparation, and oven calibration. Please refer to all the techniques and information in the detailed blog post above.

love soup?
Get My Cookbook!
Ditch the dish and embrace the bowl with Soupified: Soups Inspired by Your Favorite Dishes!
Available in ebook, paperback and hardcover.
recipe link
Thanks for all of these great turkey tips!