This post may contain affiliate links or sponsored content. That means if you click on my link and buy something, I will earn a small commission from the advertiser at no additional cost to you. For more information, see our disclosure policy.
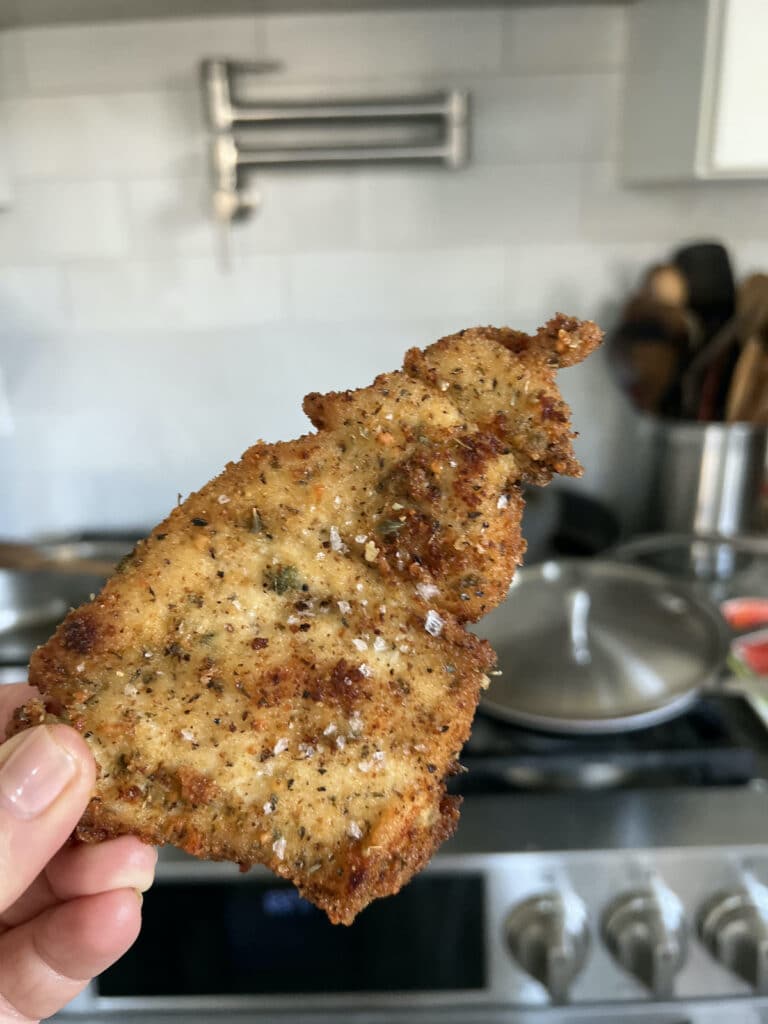
Italian Chicken Cutlets are crispy on the outside, tender and juicy on the inside, and full of flavor! Thin slices of boneless, skinless chicken breast are dipped in egg, pecorino and parsley, then a homemade, cheesy, seasoned breadcrumb mixture, then fried gently until golden. Your whole family will love this iconic Italian-American dish!

It’s always a great time for these Italian Chicken Cutlets! Salty, crispy, savory, and robust with a mouthwatering aroma, this classic Italian American fare might just be the perfect bite, despite its simplicity. With only a few, significant ingredients, this recipe is mostly about ingredient quality and technique. Making the seasoned breadcrumbs yourself and adding some grated cheese to the egg mixture makes all the difference here!
Check out my baked chicken cutlet recipe here for a lightened-up version of this recipe.
Chicken Cutlet Inspiration
I’m not sure how chicken cutlets became such an iconic, ubiquitous Italian American dish. And, I guess it doesn’t really matter.
All I know is that I have such vivid memories of the aromas in our kitchen growing up when mom would fry up a batch. And the inevitable excitement that followed.
I grew up eating these babies ALL THE TIME.
By no means am I complaining–it was a privilege to have them so often! I love that they were and continue to be a staple in my home. Chicken cutlets may just be my desert island food!
Besides being so darn satisfying, they are a serious representation of love to me. Mom and Dad would overnight containers of them to me when I was away at college (kept cold by a frozen half-gallon container of orange juice–it’s a great story…), sharing the cutlet love with my roommates. It was always the first thing I asked for coming home after being away, and it was the number one sandwich my mom would make for me, whether it was grade school, high school, college years or traveling with colleagues in adulthood. (And, yes, mom made sandwiches for my colleagues, too.) What great memories!
There are few bites as satisfying as a just-fried, hot chicken cutlet straight from the pan. Or, quite honestly, cold, straight out of the fridge, held between my fingers and standing up. Hope you try this recipe both ways!
This one’s for you, Mom.❤️
Chicken Cutlets vs. Milanese vs Schnitzel vs. Katsu
All of these are breaded and fried versions of boneless, skinless chicken breast that vary by technique, ingredients, and ethnicity/location. They are definitely very similar to each other!
Chicken Cutlets (THIS RECIPE) is the ubiquitous Italian-American form of a thin to very thin, pounded out chicken breast that is often seasoned with fresh and/or dried spices and herbs and grated cheese, goes through either a two- or three-step breading process and is pan-fried. It’s often enjoyed with sauce and cheese (i.e., parm’d) or in sandwiches.
Chicken Milanese is basically the same as cutlets, but is more a description of the finished dish. That is, the fried, thin chicken cutlet is topped with a light arugula salad tossed with extra-virgin olive oil, fresh lemon juice and shredded parmigiano (with no tomato sauce in sight). This is the version that you will most likely find in Italy.
Schnitzel has Austrian origins and is mostly made with veal, and sometimes made with chicken or pork. In any case, it is VERY thin and VERY LARGE, usually seasoned with salt and pepper only, sometimes fried in butter or lard, and served very simply with a lemon wedge.
Japanese chicken katsu uses crispy panko breadcrumbs in the coating, is generally not pounded thin, and is usually served with rice, tangy katsu sauce and raw shredded cabbage.

Why You’ll Love This Recipe . . . let me count the ways . . .
- Versatile: There are so many ways that you can serve these cutlets. From turning it into chicken parm to making it the star of a sandwich with broccoli rabe and fried peppers or simply pairing it with mashed potatoes, spaghetti with garlic and oil or polenta, you’ll be amazed at the many ways that you can enjoy this dish.
- Flexible Recipe: You can fry or bake the breaded chicken cutlets, based on your preference. I have provided information for both methods in the recipe.
- Perfect for Meal Prep! Make a big batch of these cutlets and enjoy them throughout the week. They’ll hold up to five days in the refrigerator or up to three months in the freezer in an airtight container. It’s a great way to have something delicious ready in a pinch, especially chicken parm or this dreamy chicken cutlet sandwich with broccoli rabe.

Ingredients for Italian Chicken Cutlets
Here are the ingredients we’ll be using for this chicken cutlets recipe:
- Chicken: Start with boneless skinless chicken breasts, that are then sliced and gently pounded to make a thin cutlet. Almost all supermarkets these days sell pre-sliced, thin chicken cutlets, so this is also an option that will save some time.
- Breadcrumbs, Pecorino Cheese, Dried Herbs and Spices: With so few ingredients in this recipe, the quality of each item is very important. And, one of the main reasons why these pan-fried Chicken Cutlets are so delicious is the homemade seasoned breadcrumbs. (And, the cheese, which makes the breading more crunchy and tasty.) Try not to be tempted to purchase already seasoned breadcrumbs that have been sitting on a grocery shelf for who knows how long. While I admit that I rarely make the actual fine breadcrumbs itself from scratch (my food processor doesn’t seem to be strong enough), I always purchase fine breadcrumbs from a local bakery and then turn them into seasoned breadcrumbs myself. It’s so easy and can be made with ingredients that you probably already have on hand. Once you make your own, you will likely never go back to store-bought! My main advice–use good quality spices and dried herbs. If they have been in your cupboard for several years and look sketchy–replace them! Having said all this, you can, of course, use store-bought seasoned Italian bread crumbs rather than make them from scratch, but the taste will not be the same.
- Eggs and Milk: The role of eggs in this recipe is to act as a binder during the breading process and give the breadcrumbs something to hold onto. The milk adds moisture and a bit of richness. The pecorino cheese and parsley are also added to this mixture, adding beautiful layers of flavor. Grated parmesan cheese can be used as well.
- Oil: I use a heat-friendly extra virgin olive oil for the pan-frying. You can also use either a neutral oil with a high smoke point, such as avocado oil or a vegetable oil.

How to Make Italian Chicken Cutlets
Here are the main steps for making this Italian breaded chicken cutlet recipe:
- Prep and gather all ingredients. Then, make the seasoned breadcrumbs.
- PRO-TIP: These can be made several hours or days in advance and held in the refrigerator in an airtight bag or container.
- Whisk the eggs, cheese, parsley and milk together in a large bowl until well-combined, and set this aside.


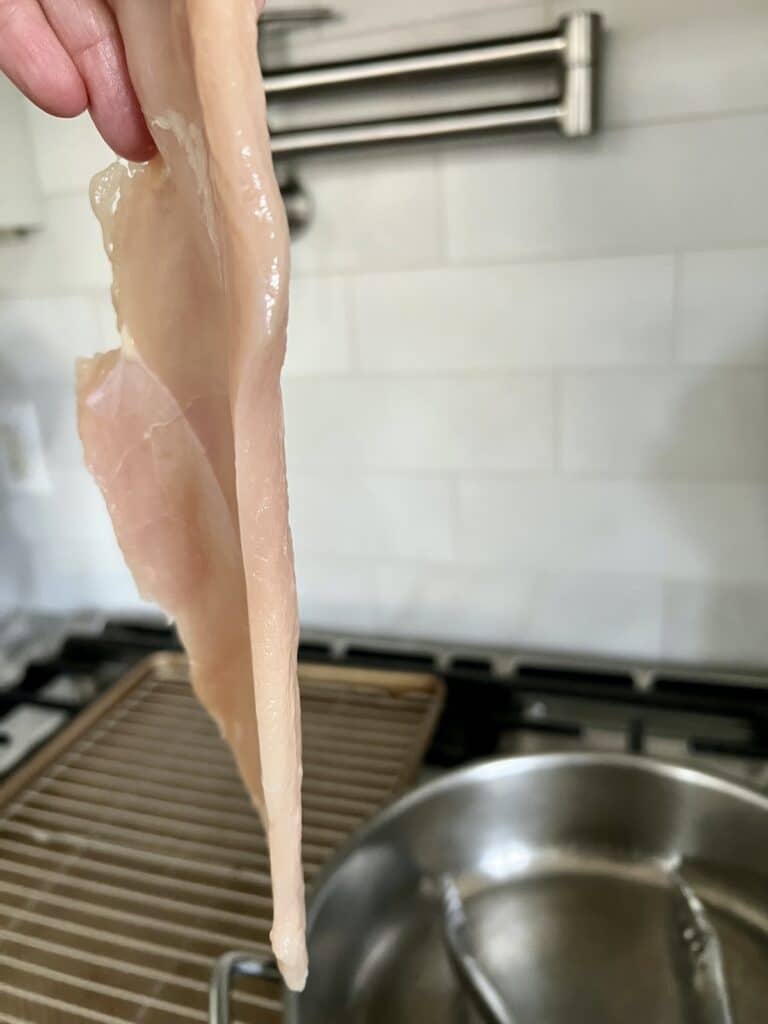
- Remove and discard all large pieces of fat from the chicken breasts.
- Then, carefully cut chicken breast in half horizontally, through the center, using a sharp knife. You want to create two thinner pieces of breast meat–the knife should be parallel to the cutting board.
- PRO-TIP: If you’re nervous about slicing the chicken, consider wearing a cut-resistant glove covered by a latex glove. Alternatively, you can purchase pre-sliced, thin chicken cutlets.
- PRO-TIP: If you freeze the chicken breasts for 20 minutes or so before slicing them, they will firm up and be easier to slice (or chop, dice, etc. for any recipe!)


- Then, place the pieces of chicken in between plastic wrap and use either a meat mallet, meat tenderizer or a rolling pin to CAREFULLY pound the breasts thinner–to approximately ½” thickness, at most.
- PRO-TIP: Don’t be too aggressive during this step, as it is easy to break the tender breast meat into an unrecognizable mush.


- Once the breasts are at the appropriate thickness, pat both sides dry with a paper towel and sprinkle both sides with some salt and black pepper.
- PRO-TIP: If the breast pieces are too large for you after being pounded, cut them down into smaller pieces.


- Place the thin, seasoned chicken cutlet pieces in the reserved egg mixture, ensuring that each both sides of each piece is thoroughly coated. This can be done a few hours in advance of frying and held in the refrigerator.


- Then, set up a breading station by arranging the following: bowl of chicken in egg mixture, then shallow bowl (or sheet pan) of seasoned breadcrumbs, then a baking sheet.

- Using either your hand or a fork/tongs, transfer each piece of chicken from the egg mixture, one-by-one, to the breadcrumbs. Thoroughly coat both sides, patting it down to ensure that the breadcrumbs adhere. Then, place the breaded chicken on a sheet pan. Continue doing this for all the chicken pieces.
- PRO-TIP: If you are using your hands for this, use one hand for the wet egg mixture and the other for the dry breadcrumb mixture. This will keep things neater and more streamlined.
- PRO-TIP: This method is actually not a classic breading procedure that starts out with flour before the egg. I’ve tried it both ways and prefer omitting the flour. The breading becomes a bit too thick with the flour added. Plus, mom didn’t do it, so neither do I!


- Meanwhile, add enough oil to a large nonstick or stainless-steel skillet to cover the bottom of the pan by about ½”. Heat the oil over medium heat until bubbles form around a wooden spoon inserted in the oil.
- PRO-TIP: If the breaded chicken is placed in the pan before the oil is hot enough, it will absorb too much oil, become soggy and the breading may fall off.


- Gently shake off any excess breadcrumbs from each piece of breaded chicken. Then transfer each piece to the hot oil, one at a time, making sure to not crowd the pan or pile the chicken on.


- Fry chicken cutlets until they are golden brown on one side, then turn it over and do the same on the other side. This will take about 4 to 5 minutes per side.
- PRO-TIP: Fry a few pieces at a time–only as many as will fit in one layer.
- PRO-TIP: You will need to work in batches and may need to add additional oil during the frying process.
- The chicken breast cutlets are cooked once they’ve reached an internal temperature of 165°F at their thickest part, which you can test with a meat thermometer. (Once you’ve fried one or two, you will likely know when they are ready without using a thermometer.)
- Once browned and finished, transfer the fried chicken cutlets to a rack placed over a sheet pan. This will help the chicken cutlets to maintain their crispiness rather than placing them on a paper towel.


- Sprinkle the cutlets very lightly with some salt, if desired.
- Then, they are ready to eat! In fact, I would be surprised if you didn’t try the first one that was ready–they are so good! Serve them as is or use them in any number of ways. See Serving Suggestions below for some great ideas.

Check out my favorite sandwich with chicken cutlets here!
Frequently Asked Questions
It could be because of a few reasons, which include not starting with a patted dry cutlet (i.e., too wet of a chicken cutlet), using too much flour (the recipe below does not use flour), not using enough breadcrumb coating and not patting it down to ensure it adheres, placing the chicken in oil that is not hot enough and/or turning the frying chicken pieces over too soon or too many times.
Yes, but recognize that the result will be a bit different. Panko is made from a crustless white bread that is processed into flakes and then dried. They have a dryer and flakier consistency than regular breadcrumbs and result in lighter and crunchier fried food. Regular breadcrumbs are processed into a finer crumb than panko and are not as dry and flaky as panko. They have more of a bread-like consistency when fried.
If you would like to substitute panko for regular (fine) breadcumbs, a 1:1 substitution usually does the trick.
In my experience, salt added to either an egg mixture or breadcrumb mixture for frying any type of cutlet always ends up sinking to the bottom of the mixture and never makes it on to the eggplant/chicken/veal, etc. So, I don’t add it at the beginning of the cooking process. Rather, I salt the raw chicken directly before it goes into the egg mixture, then again lightly once the cutlets come out of the frying pan. Much better!
Use either a pure or virgin olive oil or a neutral oil with a high smoke point, such as avocado or vegetable oil, for the pan-frying. You can certainly use extra-virgin olive oil for the frying, but it is not necessary.
Yes, to cut down on the amount of oil, you can bake these chicken cutlets instead of frying them. To do this, rub or spray a parchment-lined sheet pan thoroughly with olive oil, then arrange the breaded chicken in a single layer on the parchment. Spray the tops of the cutlets thoroughly with olive oil as well, then place in a 425°F oven for approximately 15 minutes. Turn over all the cutlets, then continue baking until the chicken is crispy and has reached an internal temperature of 165°F at its thickest part, another 10 minutes or so. You can also follow my baked chicken cutlet recipe here.

Serving Suggestions and Storage
I’m not sure if anybody needs suggestions on how to enjoy chicken cutlets. I feel like we are all born with this knowledge.
Having said this, and since you may like ideas other than eating them cold standing up right out of the fridge, here are some of my favorites:
- Like a classic chicken Milanese–topped with a simple arugula salad tossed with lemon, olive oil and parmigiano cheese. Throw in some cherry tomatoes for good measure.
- Added to a platter of insalata caprese and served with some rustic bread to make it a full meal. People love when you serve them this!
- Shingled in a baking dish or a skillet with tomato basil sauce and cheese for a classic chicken parm. Serve this in a hero roll or with a simple pasta like spaghetti aglio e olio or linguine with pesto.
- As an entrée served with a side of mashed or roasted potatoes or polenta, roasted or fried peppers, roasted vegetables, sautéed broccoli rabe or green beans.
- As an addition to a basic salad to make it more entrée-like, such as a Greek, Caesar or mixed green or even a panzanella salad!
- And, my favorite way–turn them into a sandwich (either hot, cold, or room temp)! So many options: with lettuce/tomato/onion/mayo or aioli, with broccoli rabe, roasted peppers and provolone cheese, with fresh mozzarella and pesto–the possibilities are endless and having extra chicken cutlets for sandwiches is the number one reason to make a large batch!
To store, refrigerate the fried Italian chicken cutlet in an airtight container for up to 5 days. You can also freeze them in an airtight freezer container for up to 3 months. The chicken will lose is crispiness once refrigerated or frozen, but will still be delicious.
To reheat the breaded chicken cutlets and crisp them up, place them in an oven proof dish or sheet pan. Then, bake at 350° for 10 to 12 minutes or until crispy and heated. Frankly though, one of my favorite things to do is eat a cutlet right out of the fridge standing up. Yum!

TOP CHICKEN CUTLET TIPS
- Use thin cutlets (½” thickness max) of even thickness. Slice and pound them or buy already thin chicken breasts. Even thickness will prevent uneven cooking
- Pay attention to oil temperature. The oil in the pan should be hot enough before you add chicken, but not excessively hot. Too high a heat could cause the breadcrumbs to burn before the chicken is cooked.
- Use a wide, shallow vessel such as a pasta bowl or a baking sheet to do the breading. Make it easy on yourself.
- Pat the breading onto each piece of chicken to make sure it sticks.
- Prep: Bread all the cutlets at once in advance to make it less stressful when frying.
- Use a large skillet! Don’t use a small pan as it will make you miserable. Give yourself enough space to fry. Nonstick will make you happier as well.
- Work in batches and don’t overcrowd the pan.
- Use a rack to drain the cutlets to keep them crispier.
- Make extra! You’ll be happy you did. Leftover cutlets can be held in refrigerator for up to 5 days. They make the most amazing sandwiches like this one with broccoli rabe and fresh mozzarella.
More Delicious Italian American Recipes

Italian Chicken Cutlets

Video
Equipment
- 1 Cut Resistant Glove (optional)
- 1 Tongs
Ingredients
- 3 large eggs
- ¼ cup grated Pecorino Romano cheese
- ¼ cup chopped flat-leaf parsley
- 3 Tbsp whole milk
- About 4 pounds boneless, skinless chicken breast , (about 6 large breasts)
- Pinch salt and black pepper
- 3 cups Seasoned Breadcrumbs, (see below)
- Olive or other oil as needed for frying, (See Note.)
- Salt flakes or coarse salt, , for finishing (optional)
For the Seasoned Breadcrumbs:
- 2 cups plain breadcrumbs, (fine texture)
- 1 cup grated Pecorino Romano cheese
- 2 Tbsp dried oregano
- 2 Tbsp dried basil
- 2 Tbsp garlic powder
- 2 Tbsp onion powder
- 2 tsp ground black pepper
Instructions
- Prep and gather all ingredients according to specifications above. Then, make the seasoned breadcrumbs by mixing all the breadcrumb ingredients together in a large bowl until well-combined. These can be made several hours or days in advance and held in the refrigerator in an airtight bag or container.(Please see the section above in the blog post for Step-By-Step instructions with photos.)2 cups plain breadcrumbs, 1 cup grated Pecorino Romano cheese, 2 Tbsp dried oregano, 2 Tbsp dried basil, 2 Tbsp garlic powder, 2 Tbsp onion powder, 2 tsp ground black pepper
- Next, whisk the eggs, cheese, parsley and milk together in a large bowl until well-combined. Set this aside.3 large eggs, ¼ cup grated Pecorino Romano cheese, ¼ cup chopped flat-leaf parsley, 3 Tbsp whole milk
- Remove and discard all large pieces of fat from the chicken breasts. Then, carefully slice each chicken breast in half horizontally, through the center, using a sharp knife. You want to create two thinner pieces of breast meat–the knife should be parallel to the cutting board. (See photo above.)About 4 pounds boneless, skinless chicken breast
- Then, place the pieces of chicken in between plastic wrap and use either a meat tenderizer/mallet or a rolling pin to CAREFULLY pound the breasts thinner–to approximately ½” thickness, at most. The cutlets should have relatively the same thickness all around. Don’t be too aggressive during this step, as it is easy to break the tender breast meat into an unrecognizable mush.
- Once the breasts are at the appropriate thickness, pat both sides dry with a paper towel and sprinkle both sides with some salt and black pepper. (NOTE: If the breast pieces are too large for you after being pounded, cut them down into smaller pieces, as desired.)Pinch salt and black pepper
- Place the thin, seasoned chicken cutlet pieces in the reserved egg mixture, ensuring that each both sides of each piece is thoroughly coated. This can be done a few hours in advance of frying and held in the refrigerator.
- Then, set up a breading station by arranging the following: bowl of chicken in egg mixture, then shallow bowl (or sheet pan) of seasoned breadcrumbs, then a sheet pan. Using either your hand or a fork/tongs, transfer each piece of chicken from the egg mixture, one-by-one, to the breadcrumbs and thoroughly coat both sides, patting it down to ensure that the breadcrumbs adhere, then place the breaded chicken on a sheet pan. Continue doing this for all the chicken pieces. (NOTE: If you are using your hands for this, use one hand for the wet egg mixture and the other for the dry breadcrumb mixture to keep things neater and more streamlined.)3 cups Seasoned Breadcrumbs
- Meanwhile, add enough oil to a large nonstick or stainless-steel skillet to cover the bottom of the pan by about ½”. Heat the oil over medium heat until bubbles form around a wooden spoon inserted in the oil. If the breaded chicken is placed in the pan before the oil is hot enough, it will absorb too much oil, become soggy and the breading may fall off.Olive or other oil as needed for frying
- Gently shake off any excess breadcrumbs from each piece of breaded chicken. Then transfer each piece to the hot oil, one at a time, making sure to not crowd the pan or pile the chicken on. Fry a few pieces at a time–only as many as will fit in one layer. Fry until the chicken is golden brown on one side, then turn it over and do the same on the other side. This will take about 4 to 5 minutes per side. You will need to work in batches and may need to add additional oil during the frying process.
- The chicken cutlets are cooked once they’ve reached an internal temperature of 165℉ at their thickest part, which you can test with a meat thermometer. Once you’ve fried one or two, you will likely know when they are ready without using a thermometer.
- Once browned and finished, transfer the fried chicken cutlets to a rack placed over a sheet pan. This will help the chicken cutlets to maintain their crispiness rather than placing them on a paper towel.
- Sprinkle the cutlets very lightly with some salt, if desired. Then, they are ready to eat! In fact, I would be surprised if you didn’t try the first one that was ready–they are so good! Serve them as is or use them in any number of ways. See Serving Suggestions above for some great ideas. Buon Appetito!Salt flakes or coarse salt,
Notes
- This recipe makes a large batch of chicken cutlets, but can easily be cut in half.
- If you’re nervous about slicing the chicken, consider wearing a cut-resistant glove (linked above) covered by a latex glove. Alternatively, you can purchase pre-sliced, thin chicken cutlets.
- If you freeze the chicken breasts for 20 minutes or so before slicing them, they will firm up and be easier to slice (or chop, dice, etc. for any recipe!)
- You may have extra seasoned breadcrumbs left over. They can be held for several weeks in the refrigerator in an airtight bag or container ONLY IF THEY HAVE NOT TOUCHED THE CHICKEN! If they have touched the chicken, then you cannot reuse these breadcrumbs. If you use seasoned breadcrumbs frequently, I suggest making a double or triple batch and then you will have them whenever you need.
- The amount of egg/milk and breadcrumb mixtures is an approximation and will vary based on how thinly or thickly you slice the chicken. The thinner you slice them, the more surface area that there is to coat and the more of each mixture that you will need. And, it’s the opposite with thicker slices. I prefer thinner slices because they are crispier and so much more fun to eat!
- If you’d like some picante, sprinkle a pinch of cayenne pepper into the egg mixture.
- Use either a pure or virgin olive oil or a neutral oil with a high smoke point, such as avocado oil, (or a combination thereof) for the pan-frying. You can certainly use extra-virgin olive oil for the frying, but it is not necessary.
- If you have made a double batch and/or have been frying for awhile, the oil will likely become cloudy and sludgy from all of the residual breadcrumbs and seasonings that have fallen off the chicken and have burnt. Use your judgment, but, at some point, you may need to clean the pan and start with a fresh amount of oil. Alternatively, you can let the oil cool completely, and then drain it through a sieve lined with cheesecloth or a coffee filter into a clean container. By doing this, you can reuse the oil.
- To store, refrigerate the breaded fried chicken cutlets in an airtight container for up to 5 days or freeze them in an airtight freezer container for up to 3 months. The chicken will lose is crispiness once refrigerated or frozen, but will still be delicious.
- You can bake these chicken cutlets instead of frying them. To do this, rub or spray a parchment-lined sheet pan thoroughly with olive oil, then arrange the breaded chicken in a single layer on the parchment. Spray the tops of the cutlets thoroughly with olive oil as well, then place in a 425°F oven for approximately 15 minutes. Turn over all the cutlets, then continue baking until the chicken is crispy and has reached an internal temperature of 165°F at its thickest part, another 10 minutes or so. You can also check out my baked chicken cutlets recipe here.
love soup?
Get My Cookbook!
Ditch the dish and embrace the bowl with Soupified: Soups Inspired by Your Favorite Dishes!
Available in ebook, paperback and hardcover.
These were easy and delicious and very reminiscent of growing up in a Sicilian-American household in Brooklyn where my mom made veal cutlets similarly . I really like the way you write your recipes — very easy to follow, and very easy to remember your ingredients. The only thing I would do differently is reduce the amount of oregano in the seasoned breadcrumbs by half but that is a personal preference. I used the bread crumbs little by little and had plenty leftover which I then put in the freezer for next time. Thank you for your great recipes.
Thank you so much for your feedback and comment, Joanne! It is much appreciated!
So delicious and so easy to prepare and bake!
Love it! Tasty, crispy, usually we always have leftovers……….not with this. Made it twice in a week!! Thanks M.
Twice is better than once! Thanks for the comment. 🙂
Perfectly crispy and went so well with pasta! We finished them all in a day.
Sounds great! Thanks for the comment, Charlotte.
I’m Italian & one thing I have not mastered is chicken cutlets. Every time I think I found the one, I had to break up with the recipe. This one is a keeper and has the seal of approval from the family. At last the right one has found its way to my kitchen and will continue to make it to the table for years to come!
This makes me SOOOO happy, Lisa! I am over the moon that this recipe is your “family-approved”. Thank you so much for this comment and happy cutlet cooking!
These are the best chicken cutlets you can imagine!! Every time I make them, it’s a flashback to when my mom lovingly made them for our family.
I’m so glad! That makes me happy. Thanks for the comment, Roseanne. 🙂
Perfect recipe and all the information and tips really helped me. The breading on my cutlets always used to fall off, but not any more! Thank you.